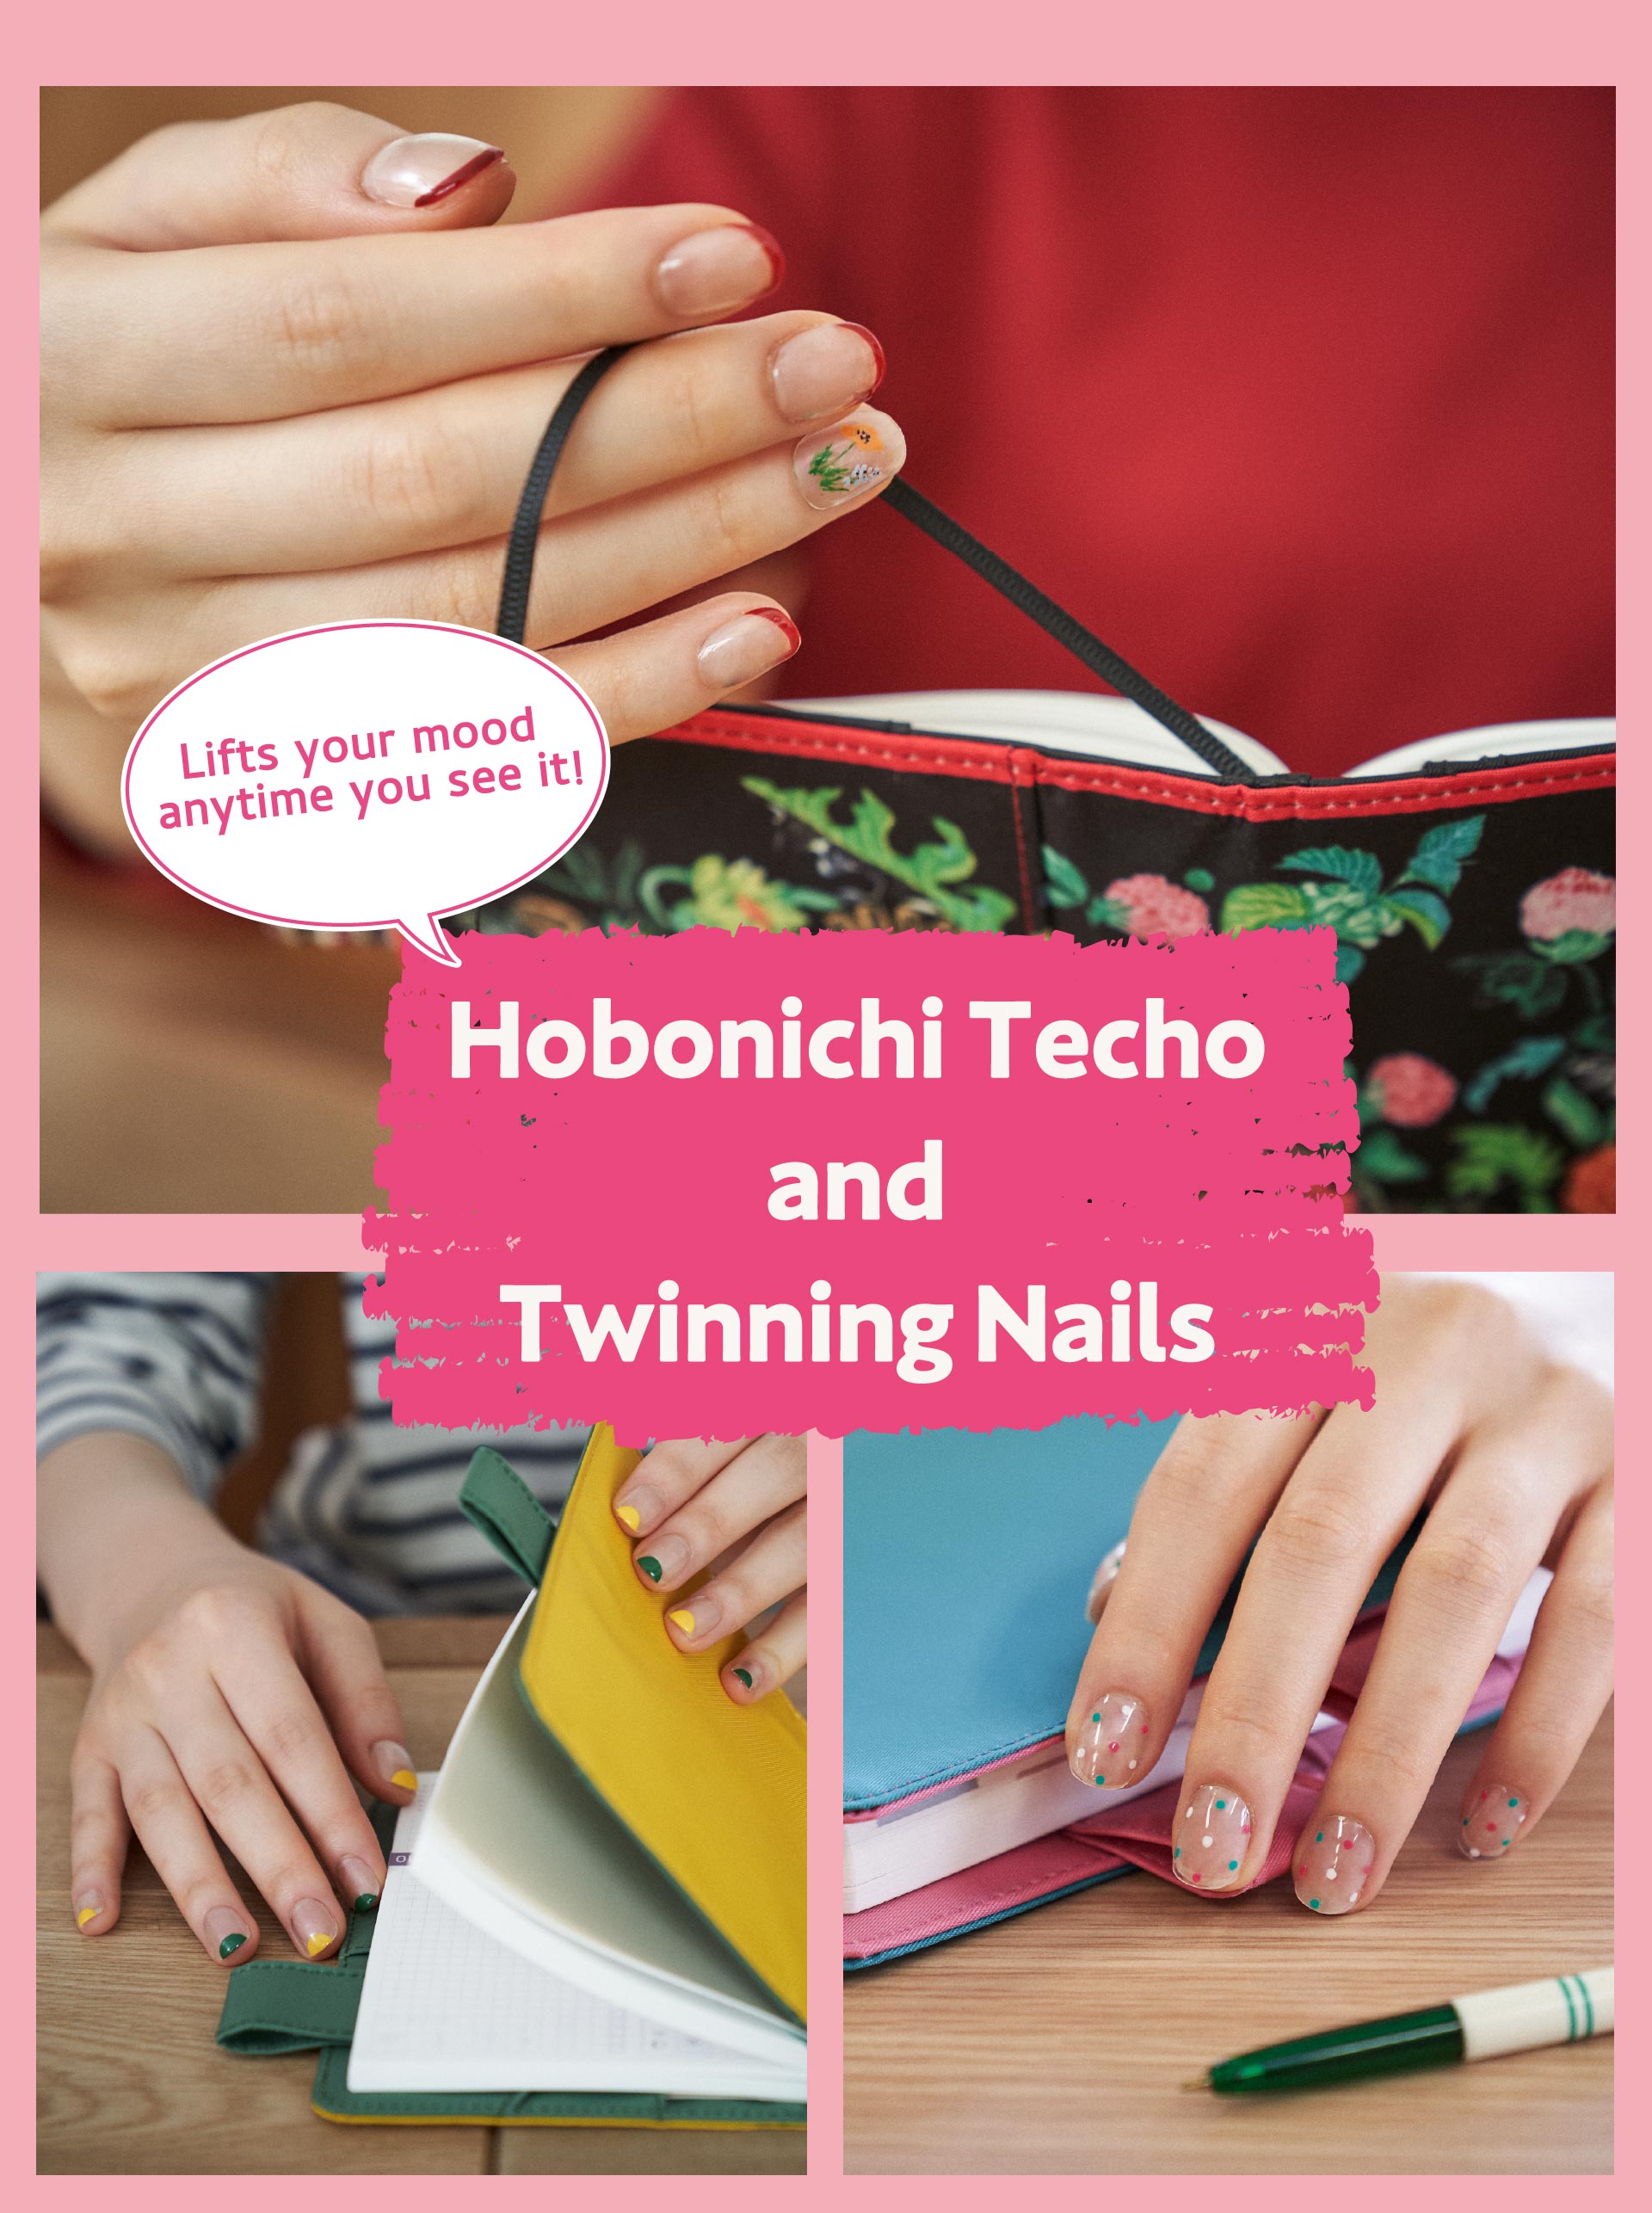
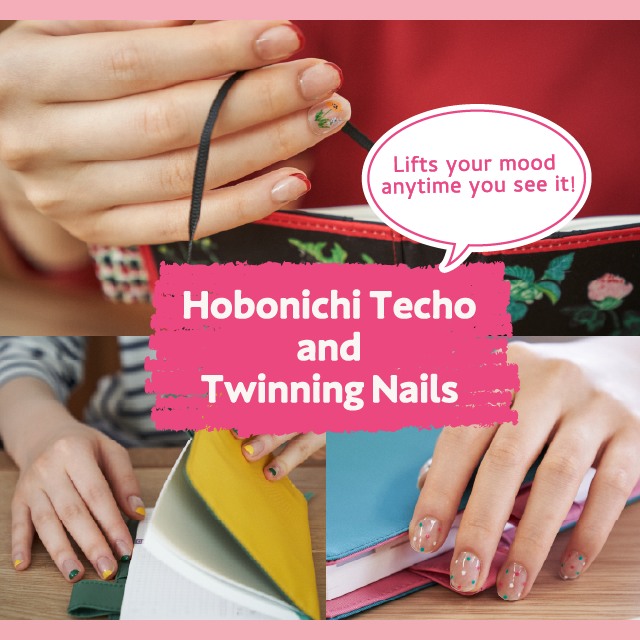
As well as it being easy to use, the wide variety
in covers are also part of the charm of the
Hobonichi Techo. We've picked six techos out
of the lineup and created nail arts to match the
color scheme of the cover. When your nails
twin with your techo, it will be sure to lift up
your mood anytime it catches your eyes! With
our new lifestyle of spending more time at
home, it might be the little things that might be
important. All of the nail arts we'll be showing
you today are easy to do by yourself, and is
less likely to go wrong! We hope you try some
of these feeling relaxed.


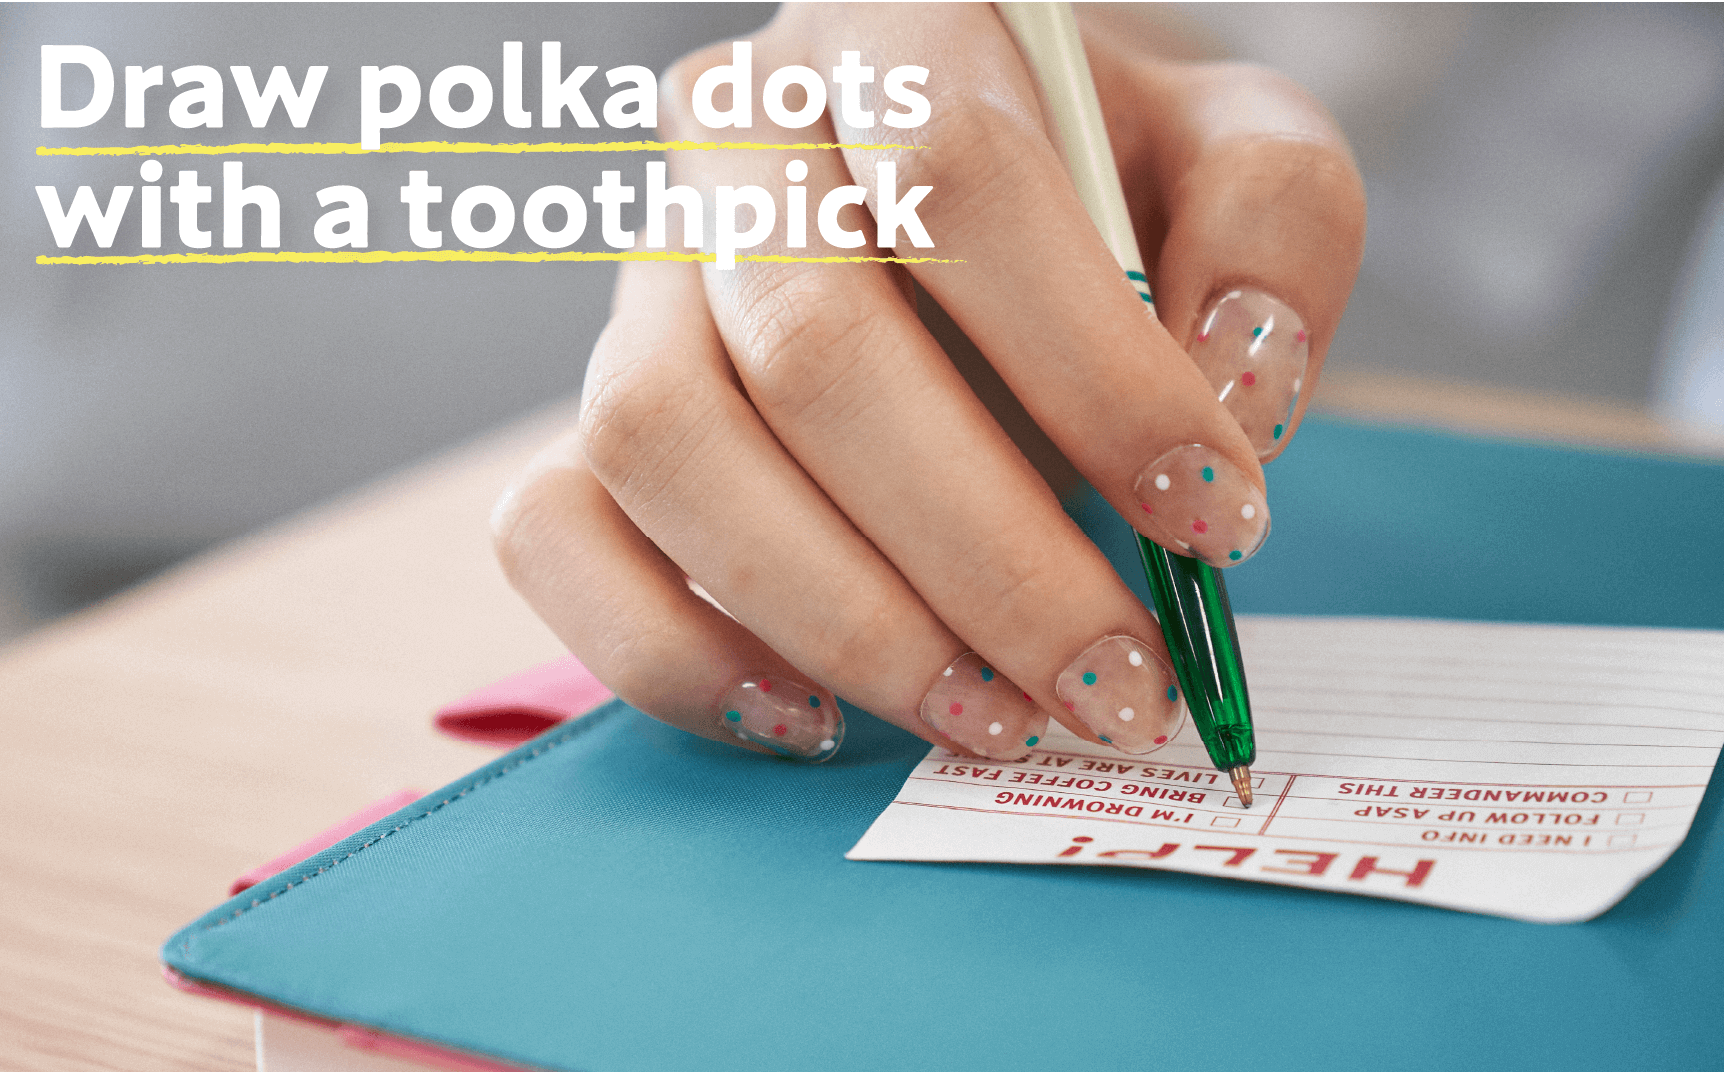
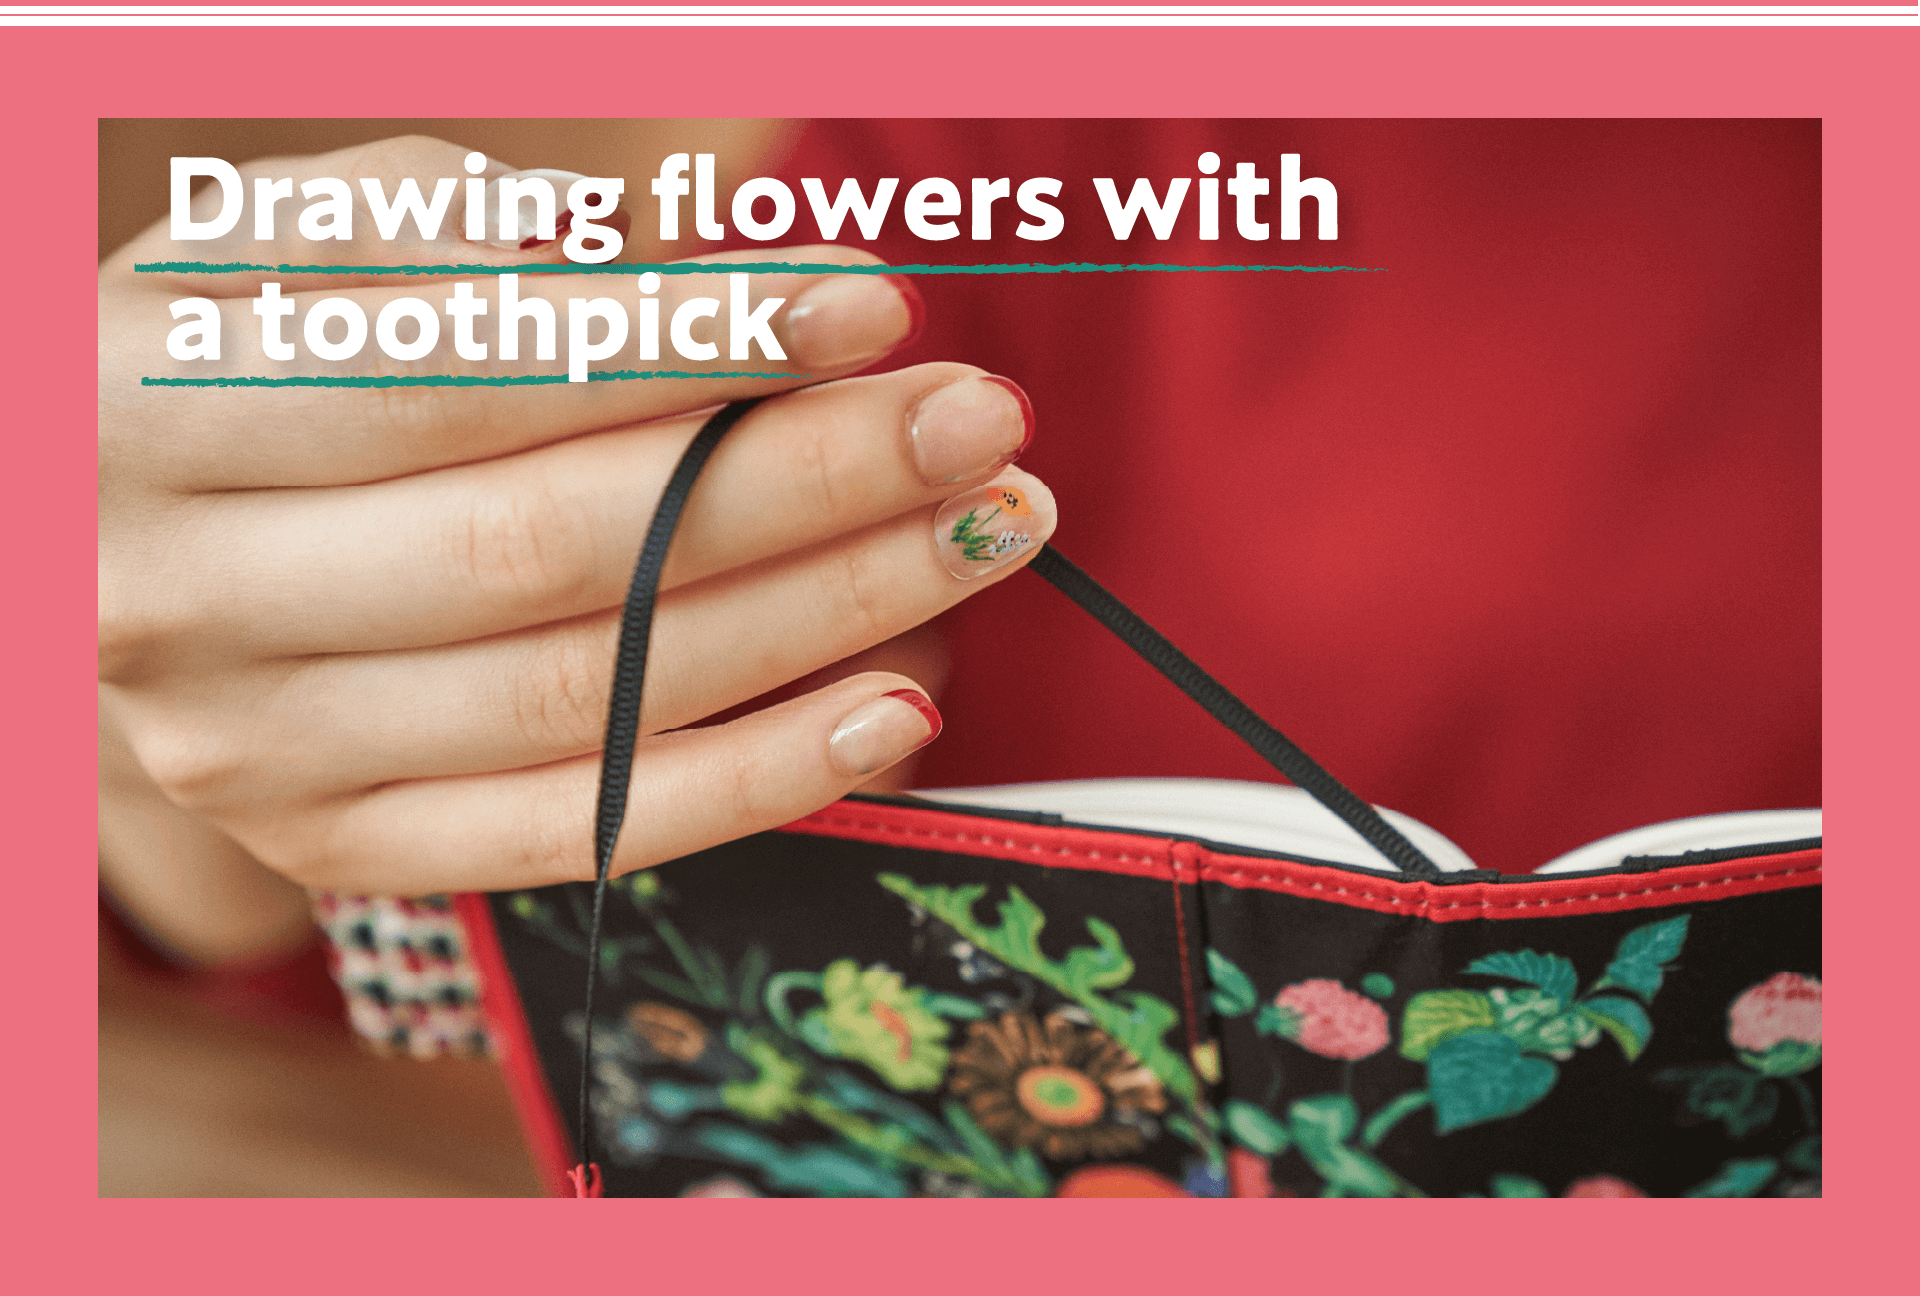
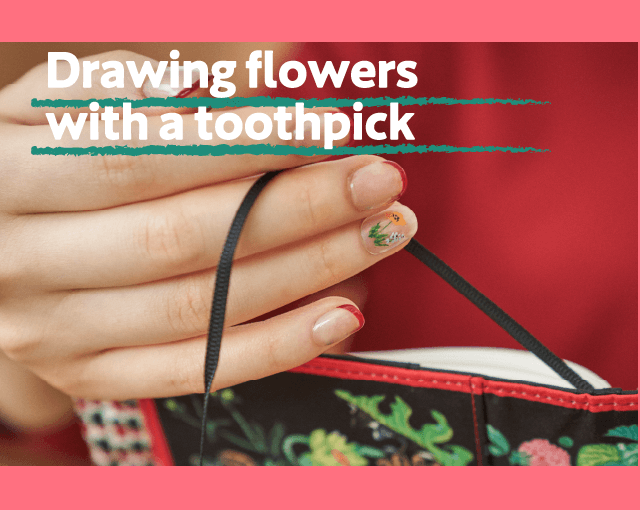
Nail arts that look complicated at first glance, such as polka
dots and floral designs, are actually quite easy if you use
toothpicks. These are easy to do even if you aren't too
confident with your artistic skills or if you are a bit clumsy
with your hands. If you're worried, try it out on a notepad or
techo before you start. You'll feel satisfied whenever these
charming nail art catches your eyes!

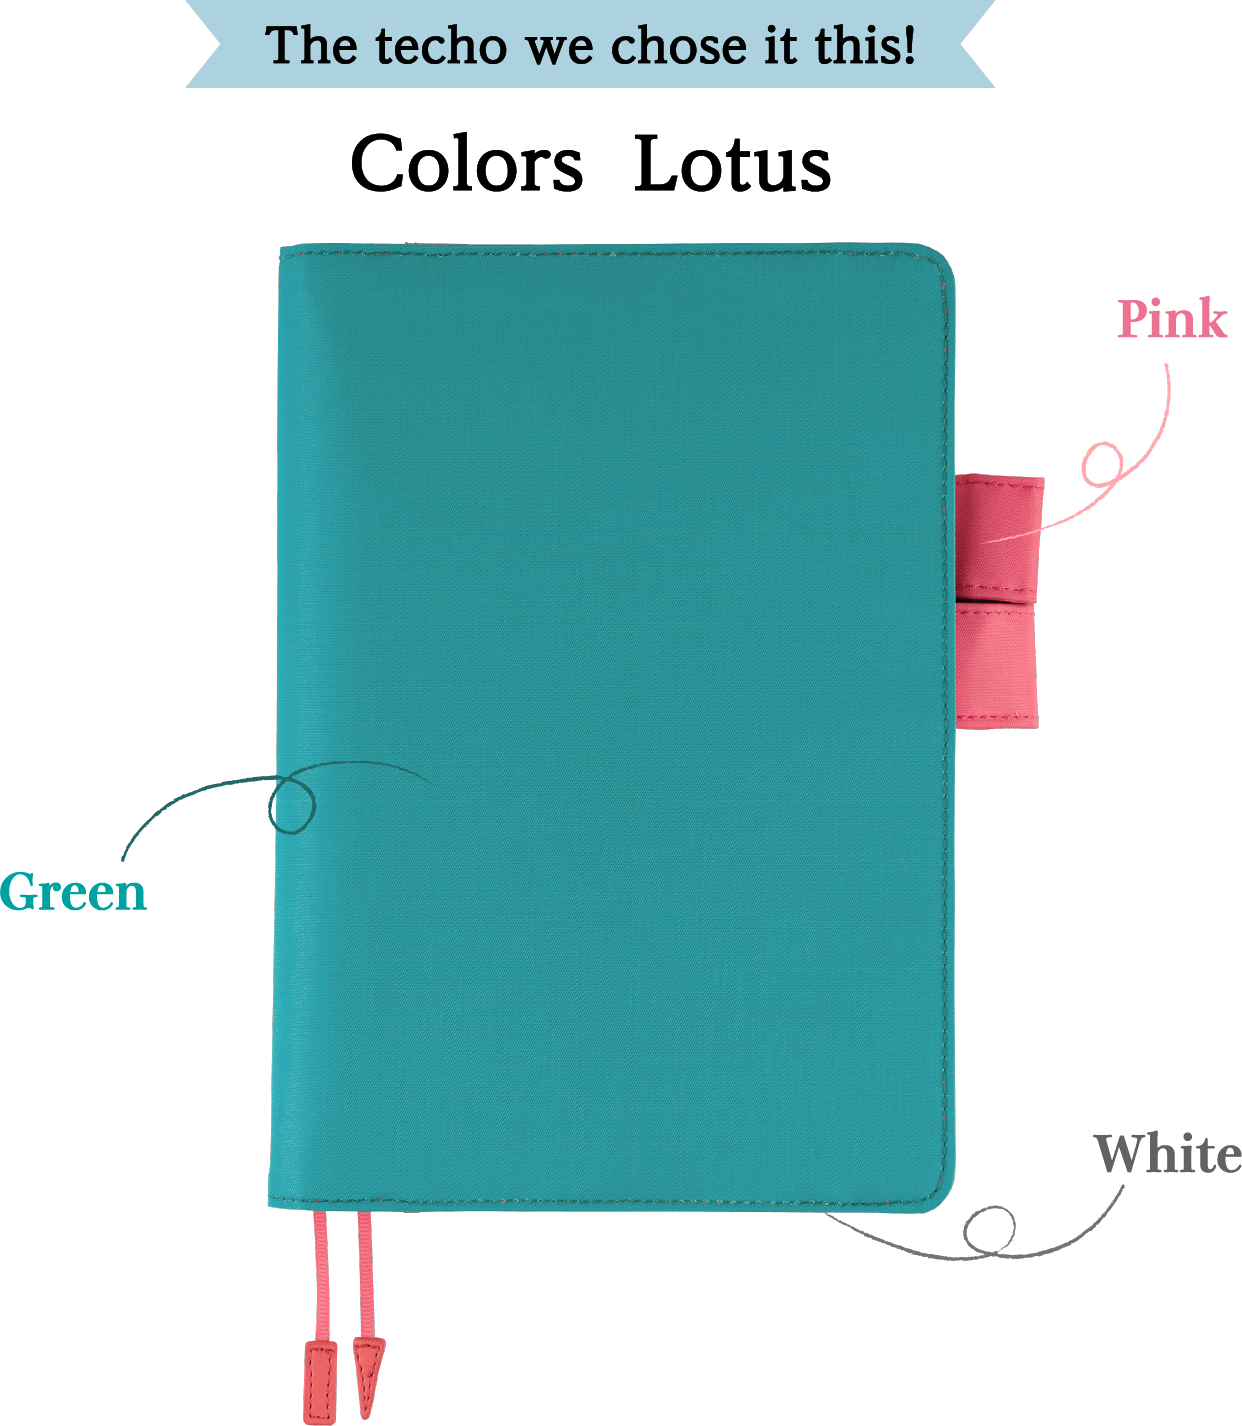
The blue/green color matched with the bright pink will brighten up your mood
anytime you hold it in your hands.
We'll be creating a fun polka dot design with these colors,
plus the white coming from the techo book.
anytime you hold it in your hands.
We'll be creating a fun polka dot design with these colors,
plus the white coming from the techo book.
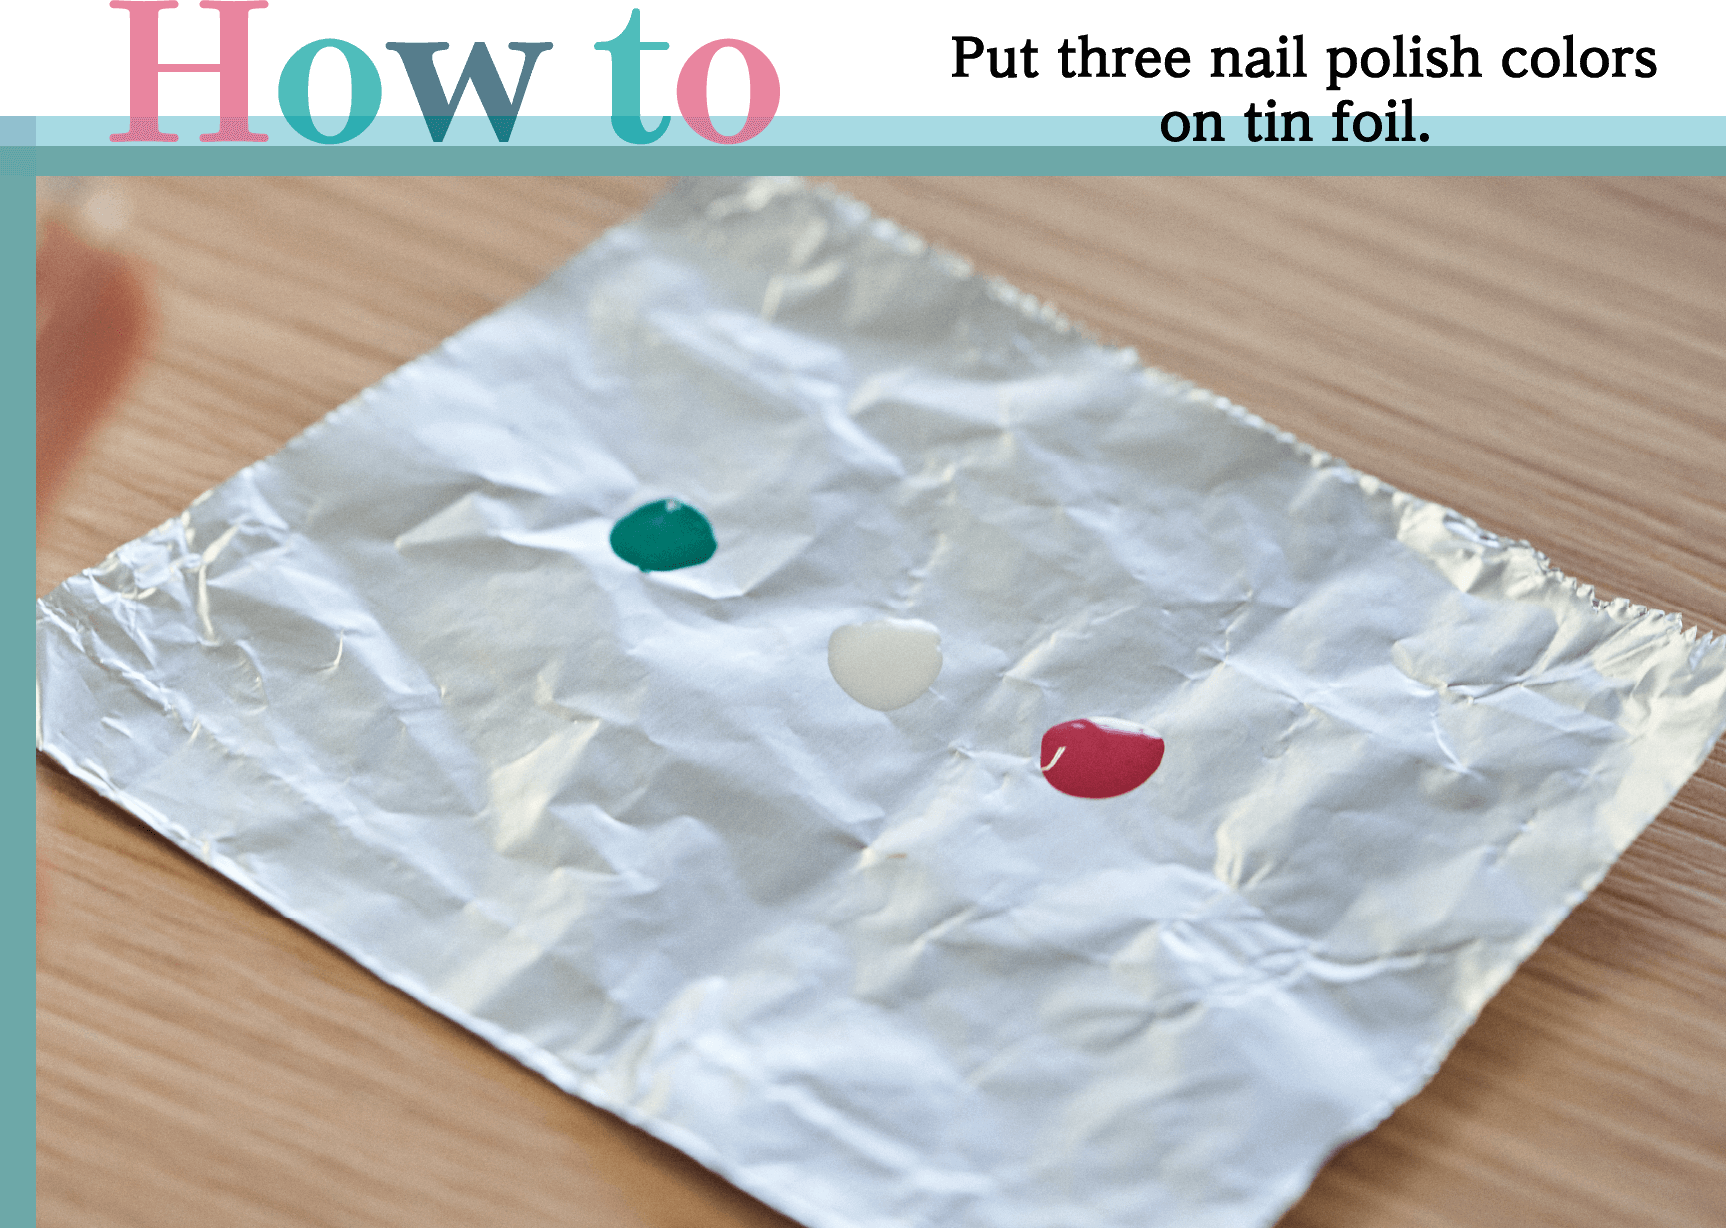
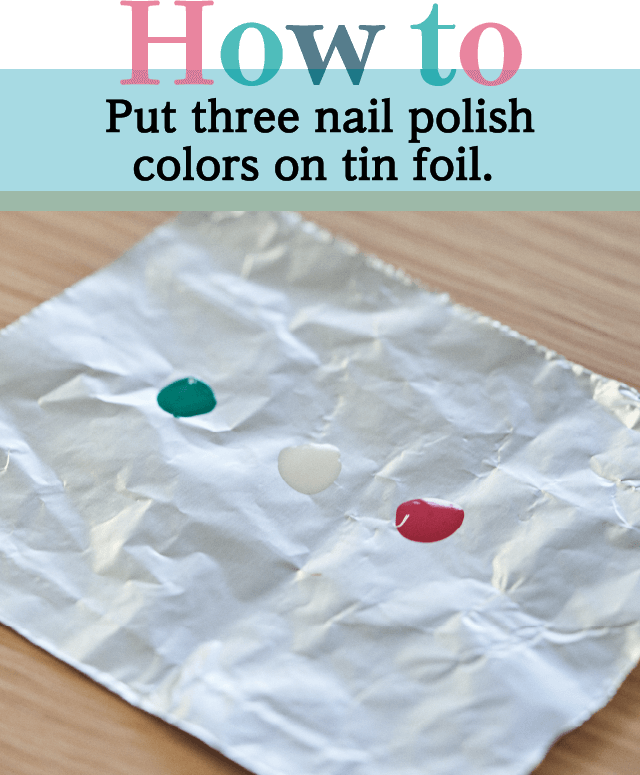
Prepare three toothpicks (one for each color). After applying base
coat to all of your nails, place a drop or two of green, white and pink
nail polish on to tin foil. If the nail polish starts to dry out while you're
working on this nail art, add more.
coat to all of your nails, place a drop or two of green, white and pink
nail polish on to tin foil. If the nail polish starts to dry out while you're
working on this nail art, add more.
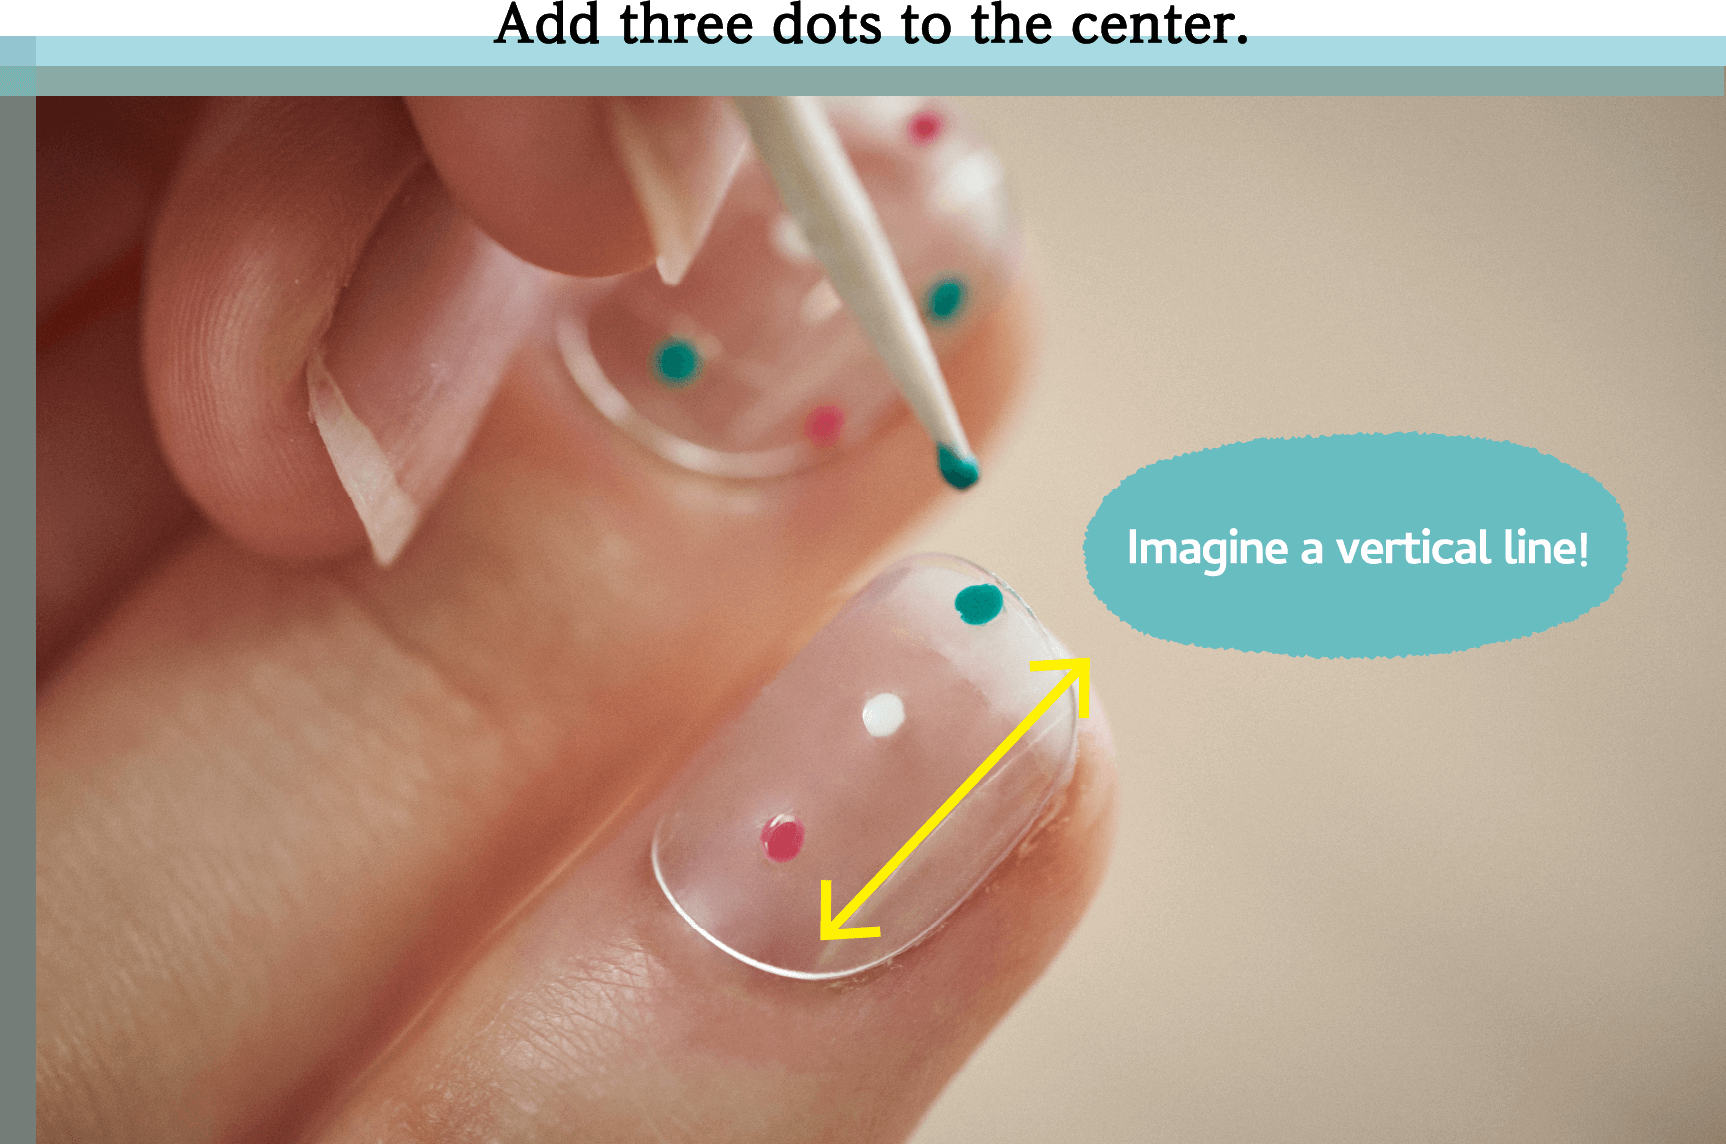
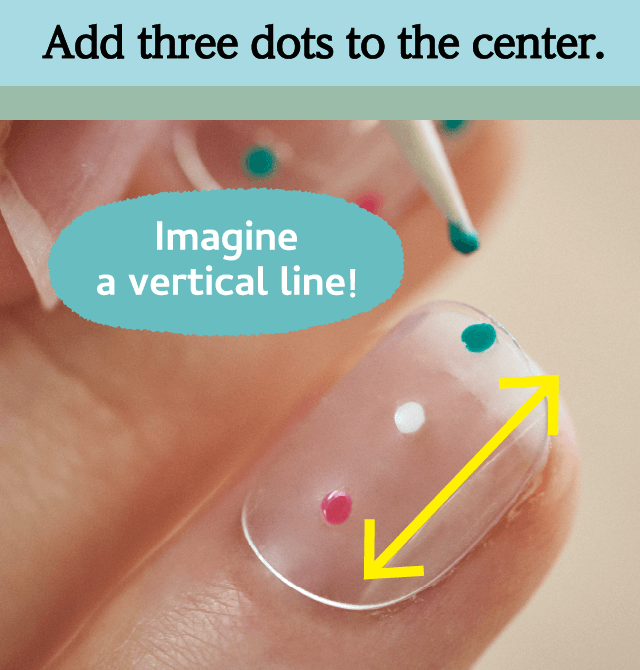
Imagine drawing a vertical line on the center of your nails. While
keeping this image in mind, dip a toothpick in the white nail polish
you'd placed on the tin foil, and place a dot on the middle of that
center line. Wipe of nail polish off from the toothpick as you go along
so the rest of the process will be easier. Take a new toothpick and dip
it in the pink nail polish, and place a dot under the white dot. Change
the toothpick once again to draw a green dot on top of the white dot.
The point here is to make sure the three dots are lined up in a straight
line and are in equal distance from each other.
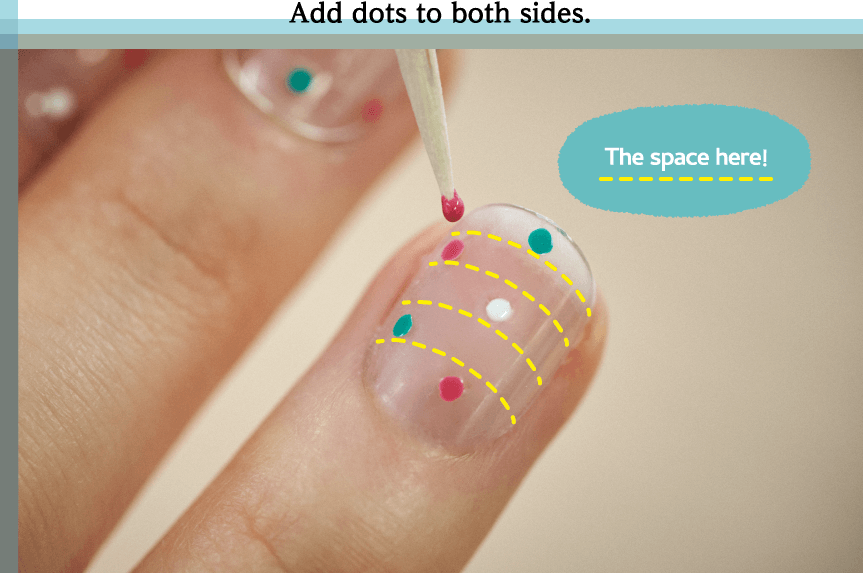
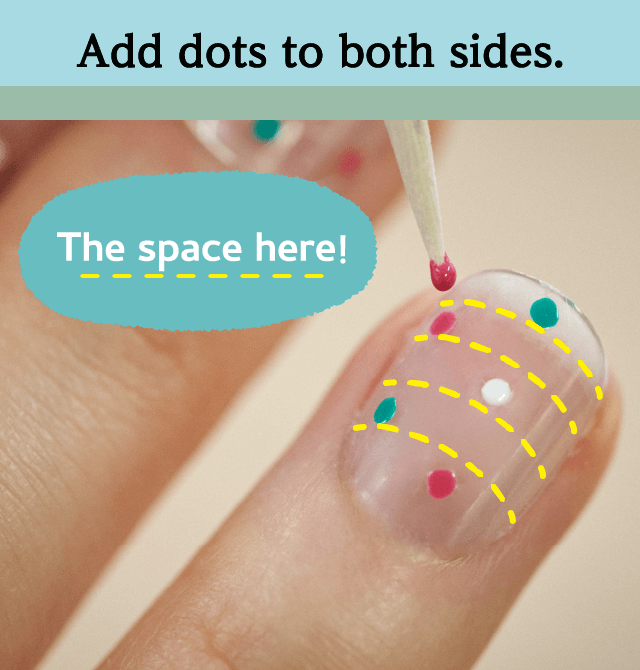
Draw on a pink dot and a green dot on the left side of the line of dots
you just drew. Make sure that each dot is placed somewhere between
the top dot and the middle dot, or the middle dot and the bottom dot.
Do the same on the right side, but with pink and white nail polish.
Where you place each color is up to you, but the whole look will
balance out if you make sure that the same colors aren't next to each
other. Once the dots have dried, apply top coat.

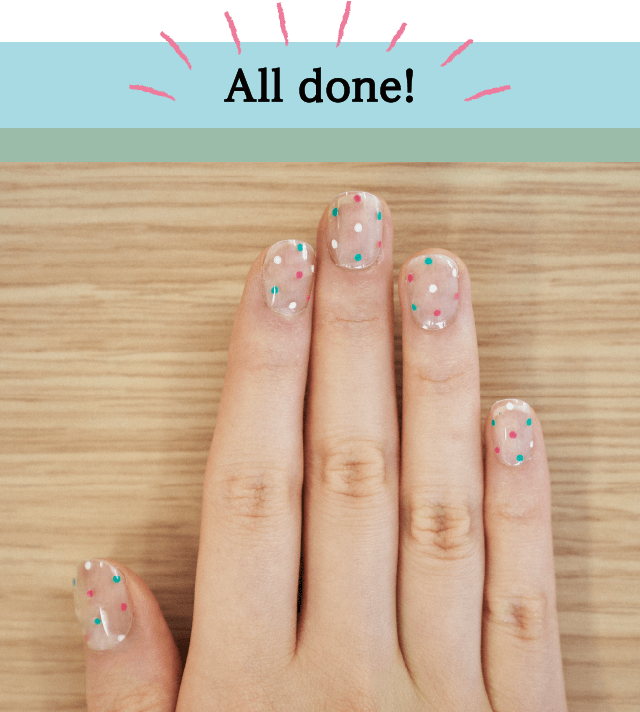
By changing where you place each color depending on the nail, your
nails will look merrier. When trying this out with different colored
nail polishes, we recommend using vibrant colors. Using chic colors
like black, navy, or a wine red will make for a grown-up look.
Whichever color scheme you choose, adding white will create an
effortless look and will bring the whole look together.
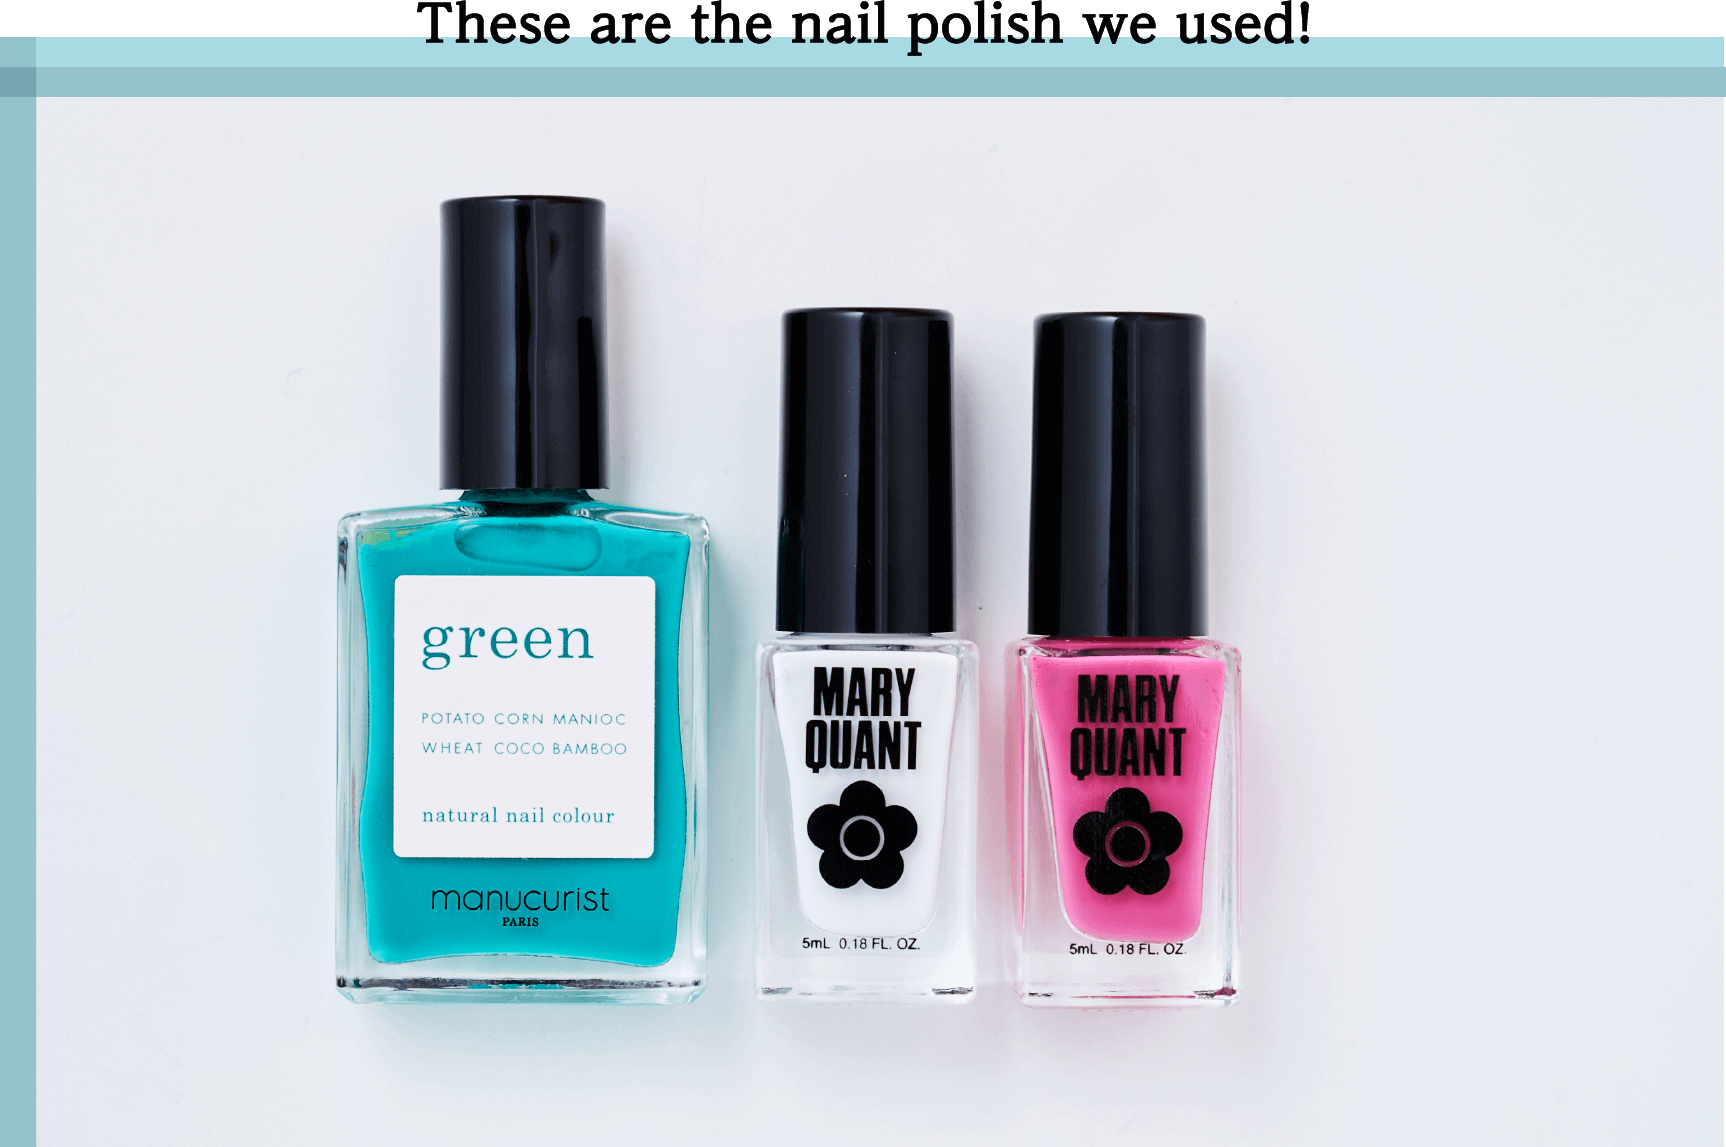

Left / green [Green Garden]
JPY 2,200 (tax excluded)
https://www.manucurist.com/en/
Middle / Mary Quant [007 *Available while supplies last]
JPY 1,300 (tax excluded)
https://www.maryquant.co.uk/
Right / Mary Quant [002]
JPY 1,300 (tax excluded)
https://www.maryquant.co.uk/
JPY 2,200 (tax excluded)
https://www.manucurist.com/en/
Middle / Mary Quant [007 *Available while supplies last]
JPY 1,300 (tax excluded)
https://www.maryquant.co.uk/
Right / Mary Quant [002]
JPY 1,300 (tax excluded)
https://www.maryquant.co.uk/
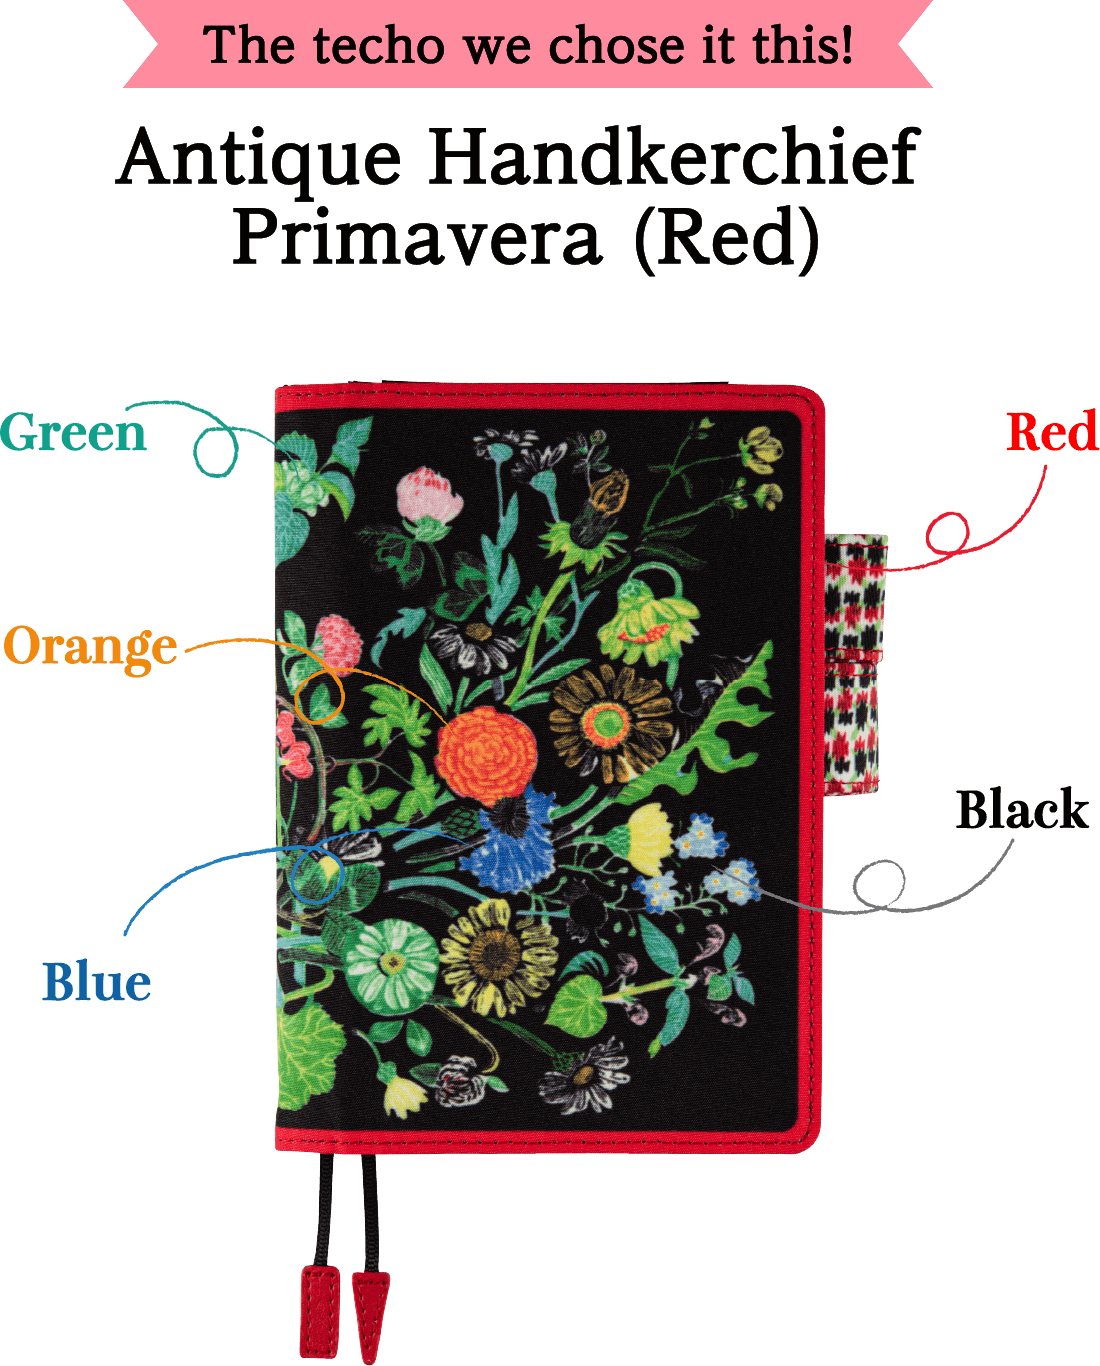
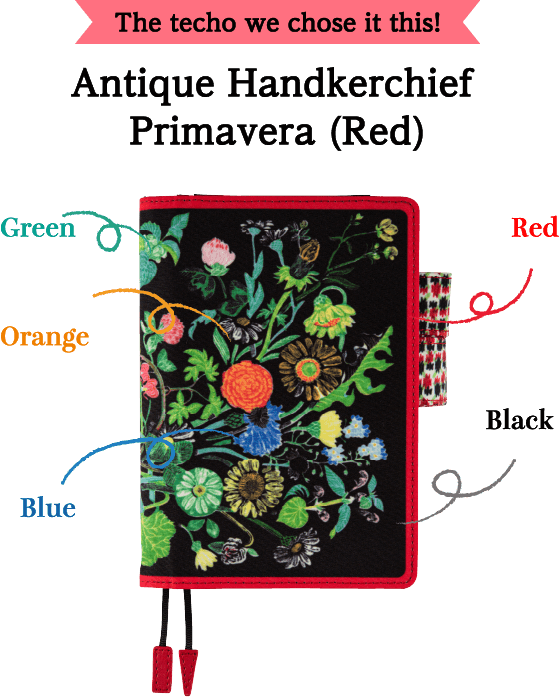
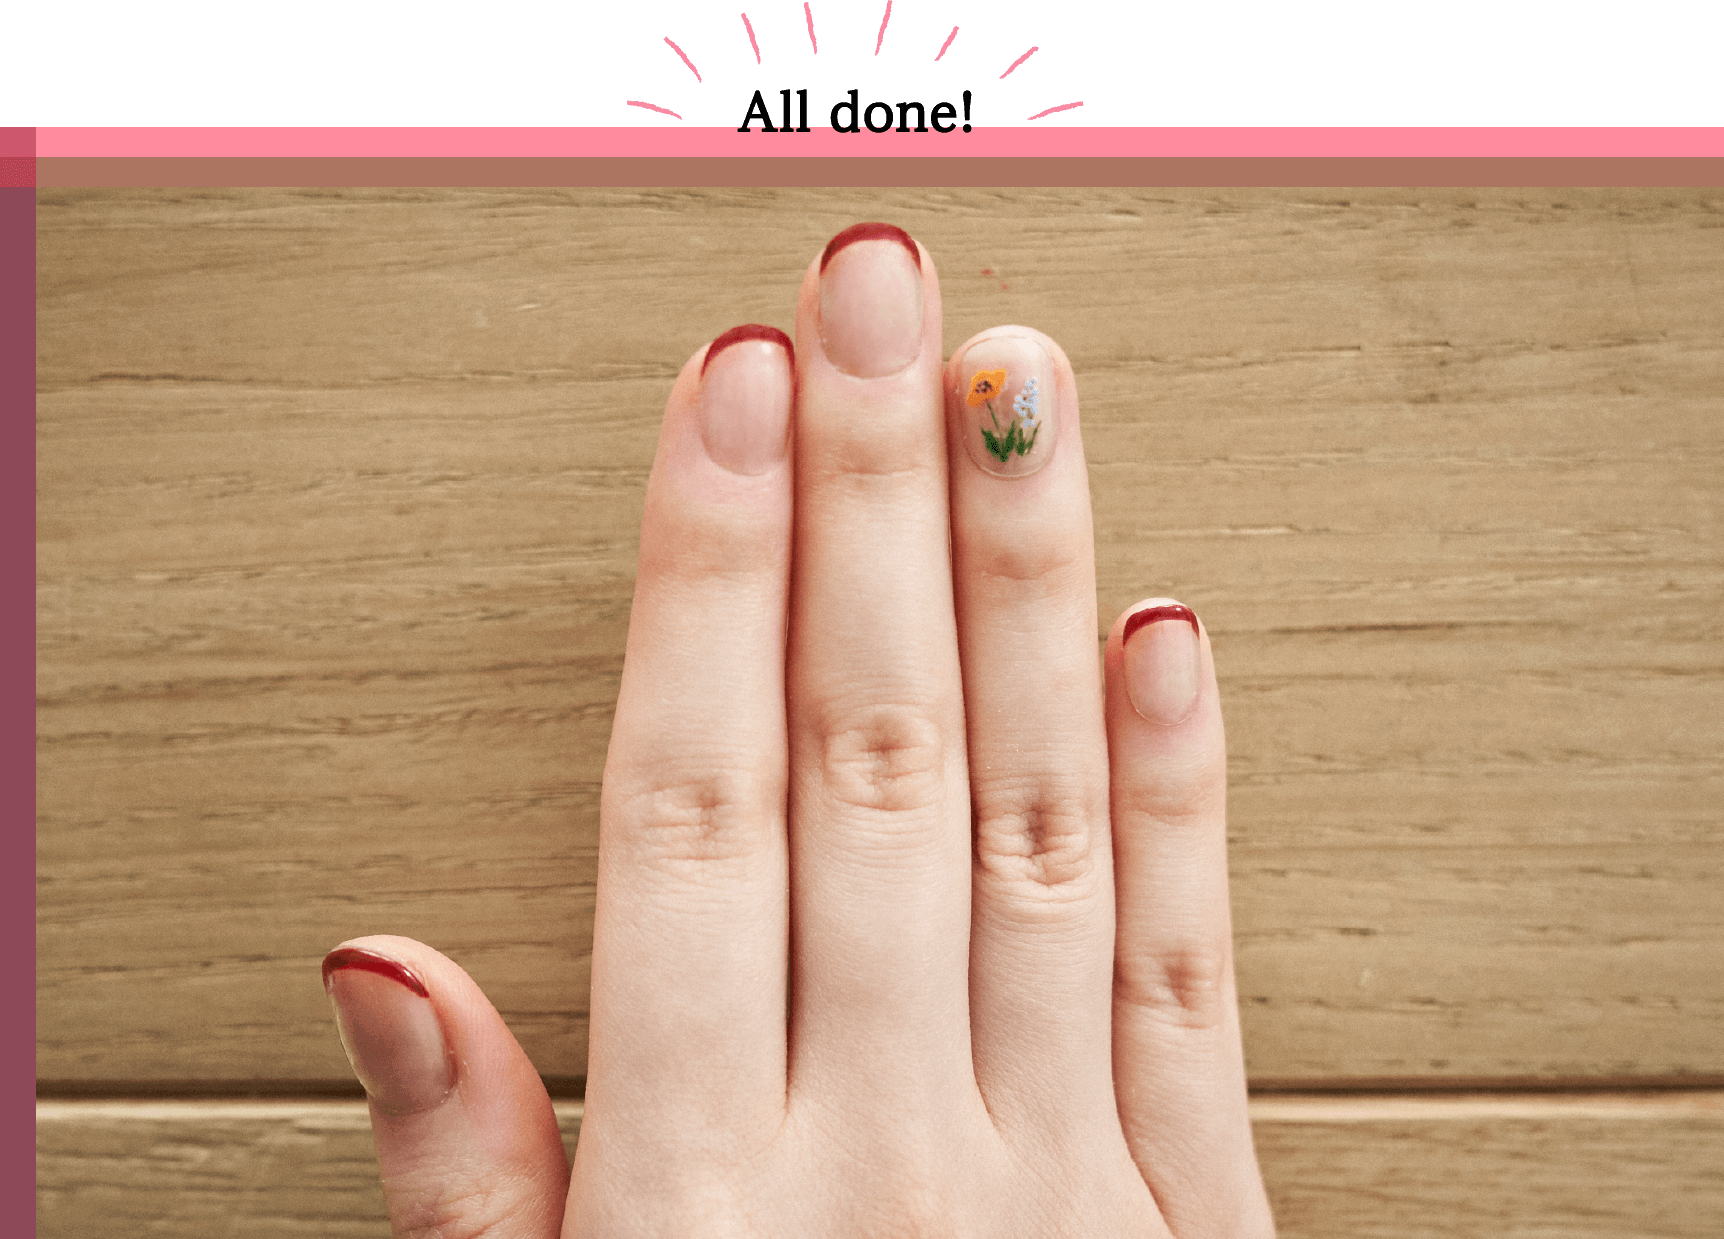
This cover shows the print of an antique handkerchief,
and the black background brings out the vibrant colors of the flowers and leaves.
The red piping also stands out.
We've chosen green, orange, blue, red and black
from this cover to try out twinning nails.
and the black background brings out the vibrant colors of the flowers and leaves.
The red piping also stands out.
We've chosen green, orange, blue, red and black
from this cover to try out twinning nails.

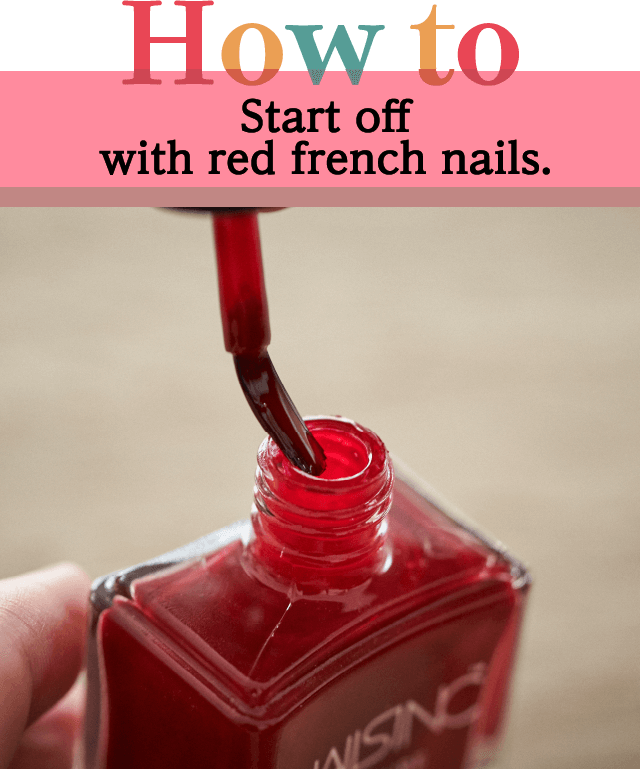
Apply base coat to your entire nails and let them dry. Then, wipe off
excess red nail polish on the bottle. Adjust it so that there's a bit of
nail polish on one side of the brush.
excess red nail polish on the bottle. Adjust it so that there's a bit of
nail polish on one side of the brush.
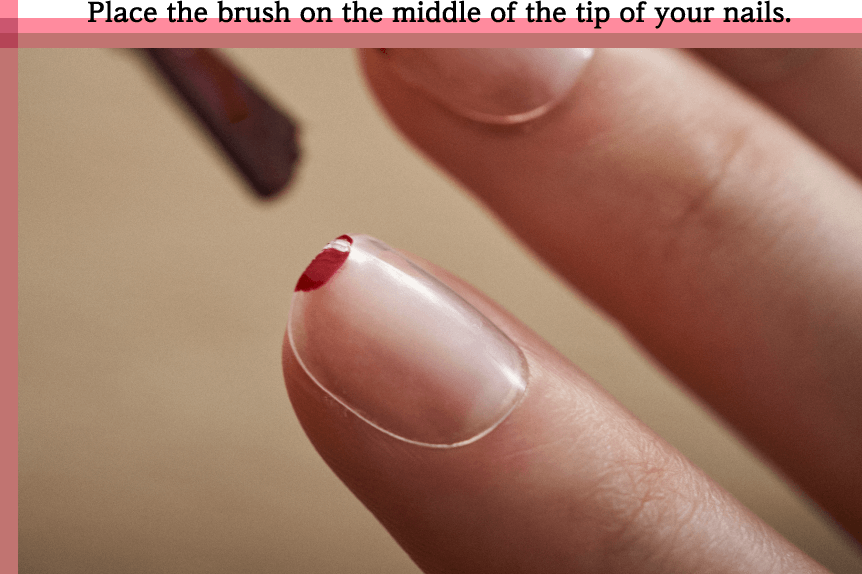
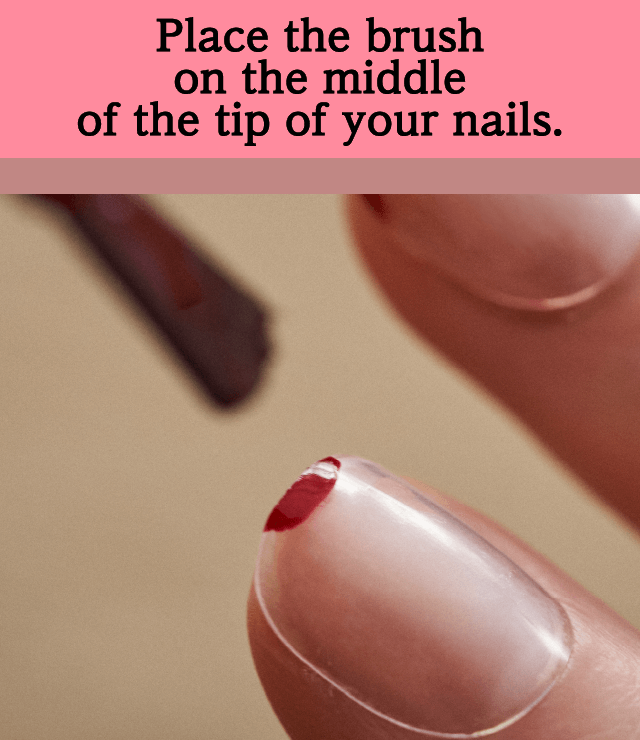
Lay the brush flat, and place the red nail polish to the middle of your
nail tips. We're aiming for a thin french nail, so be sure not to make
the line too fat.
nail tips. We're aiming for a thin french nail, so be sure not to make
the line too fat.
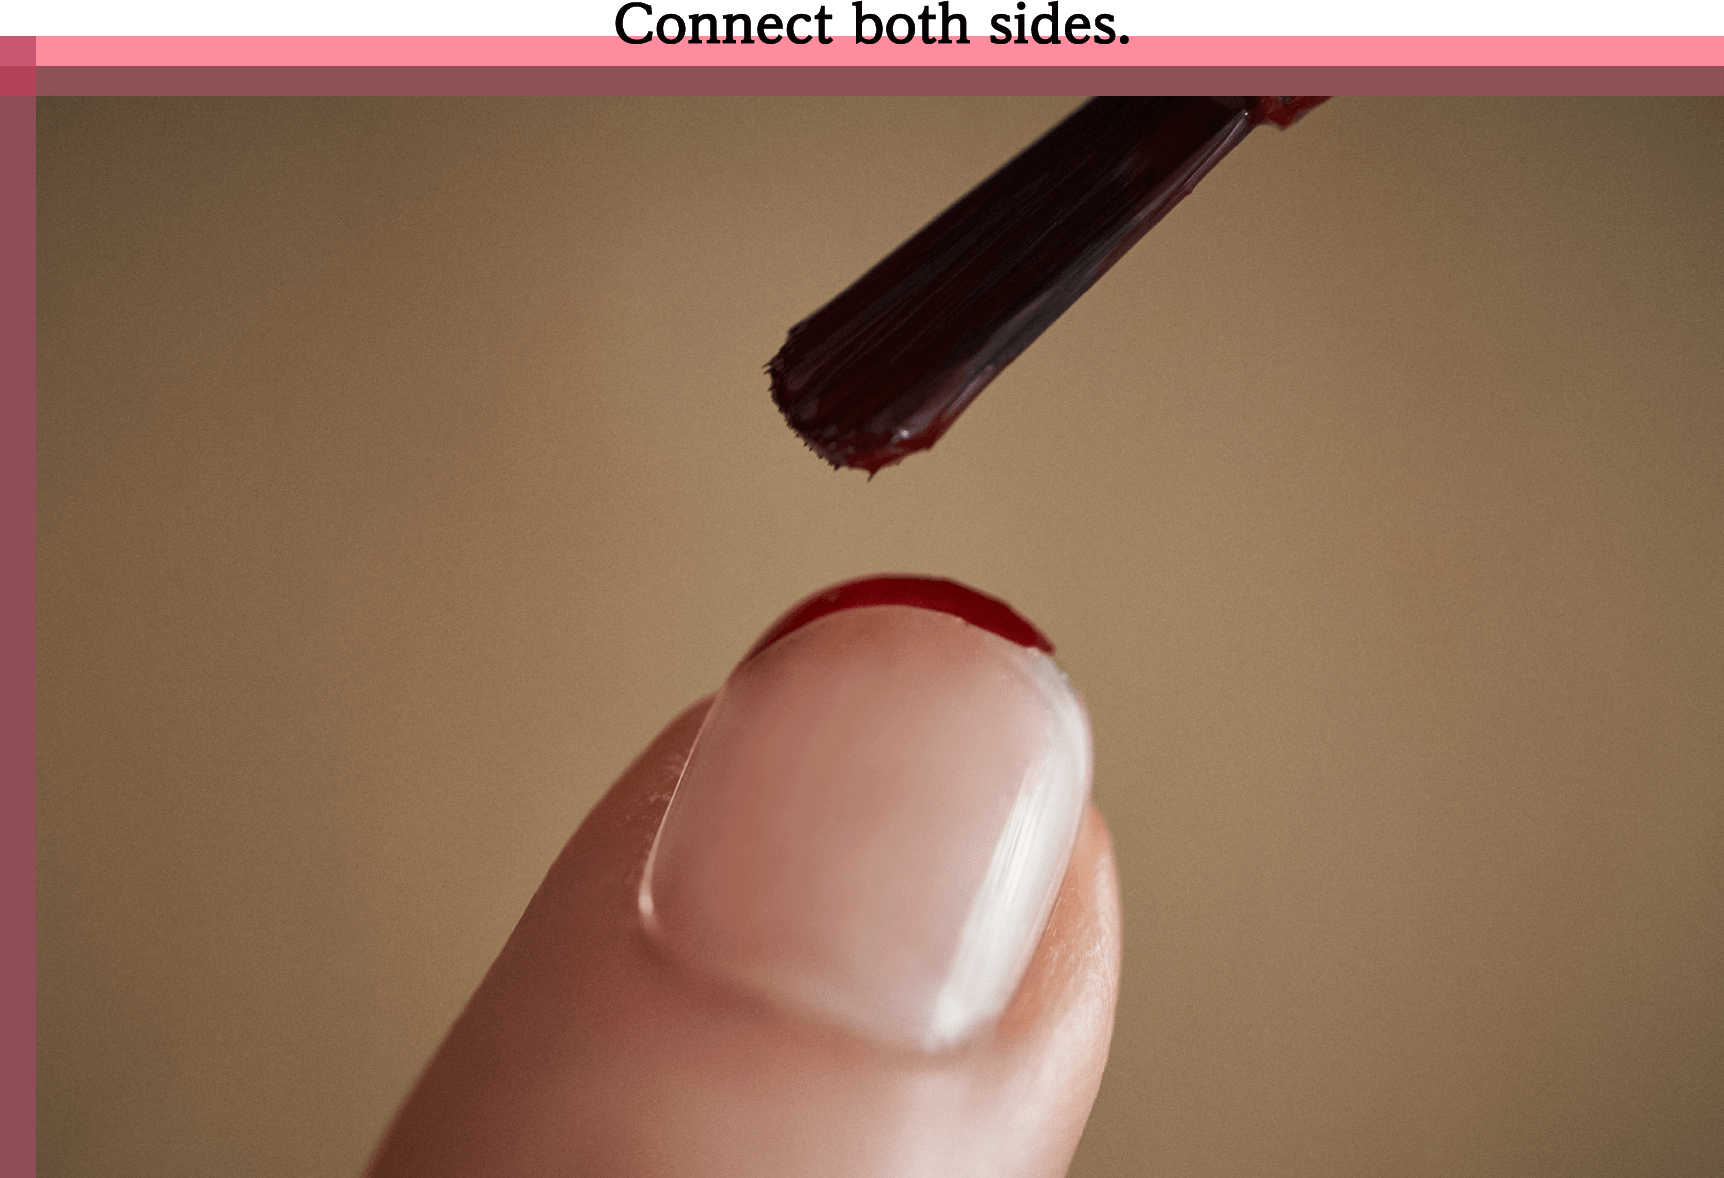
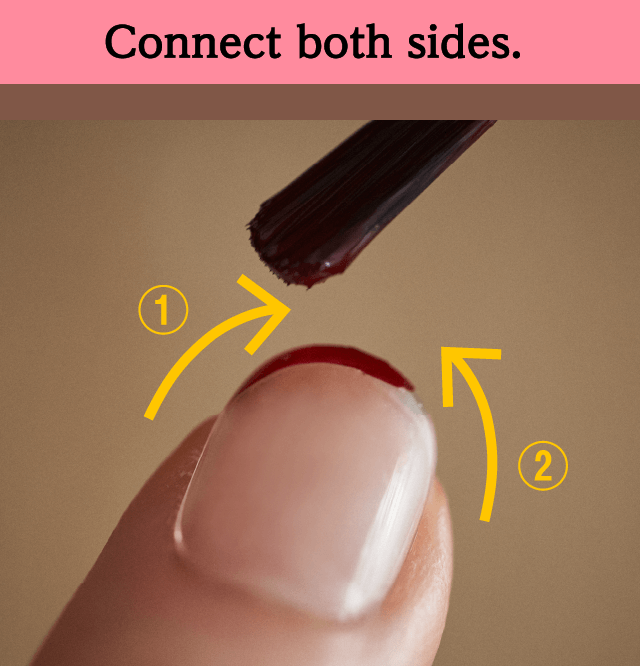
Bring the brush while laying it flat from the left end of your nail tip
towards the red you'd just painted in the middle. Do the same on the
right side. Follow the same steps for your thumb, middle finger and
little finger. Even if the nail polish smudges out of line, all you have to
do it wipe it off with cotton buds soaked in nail polish remover, so
don't stress too much and relax as you do it!
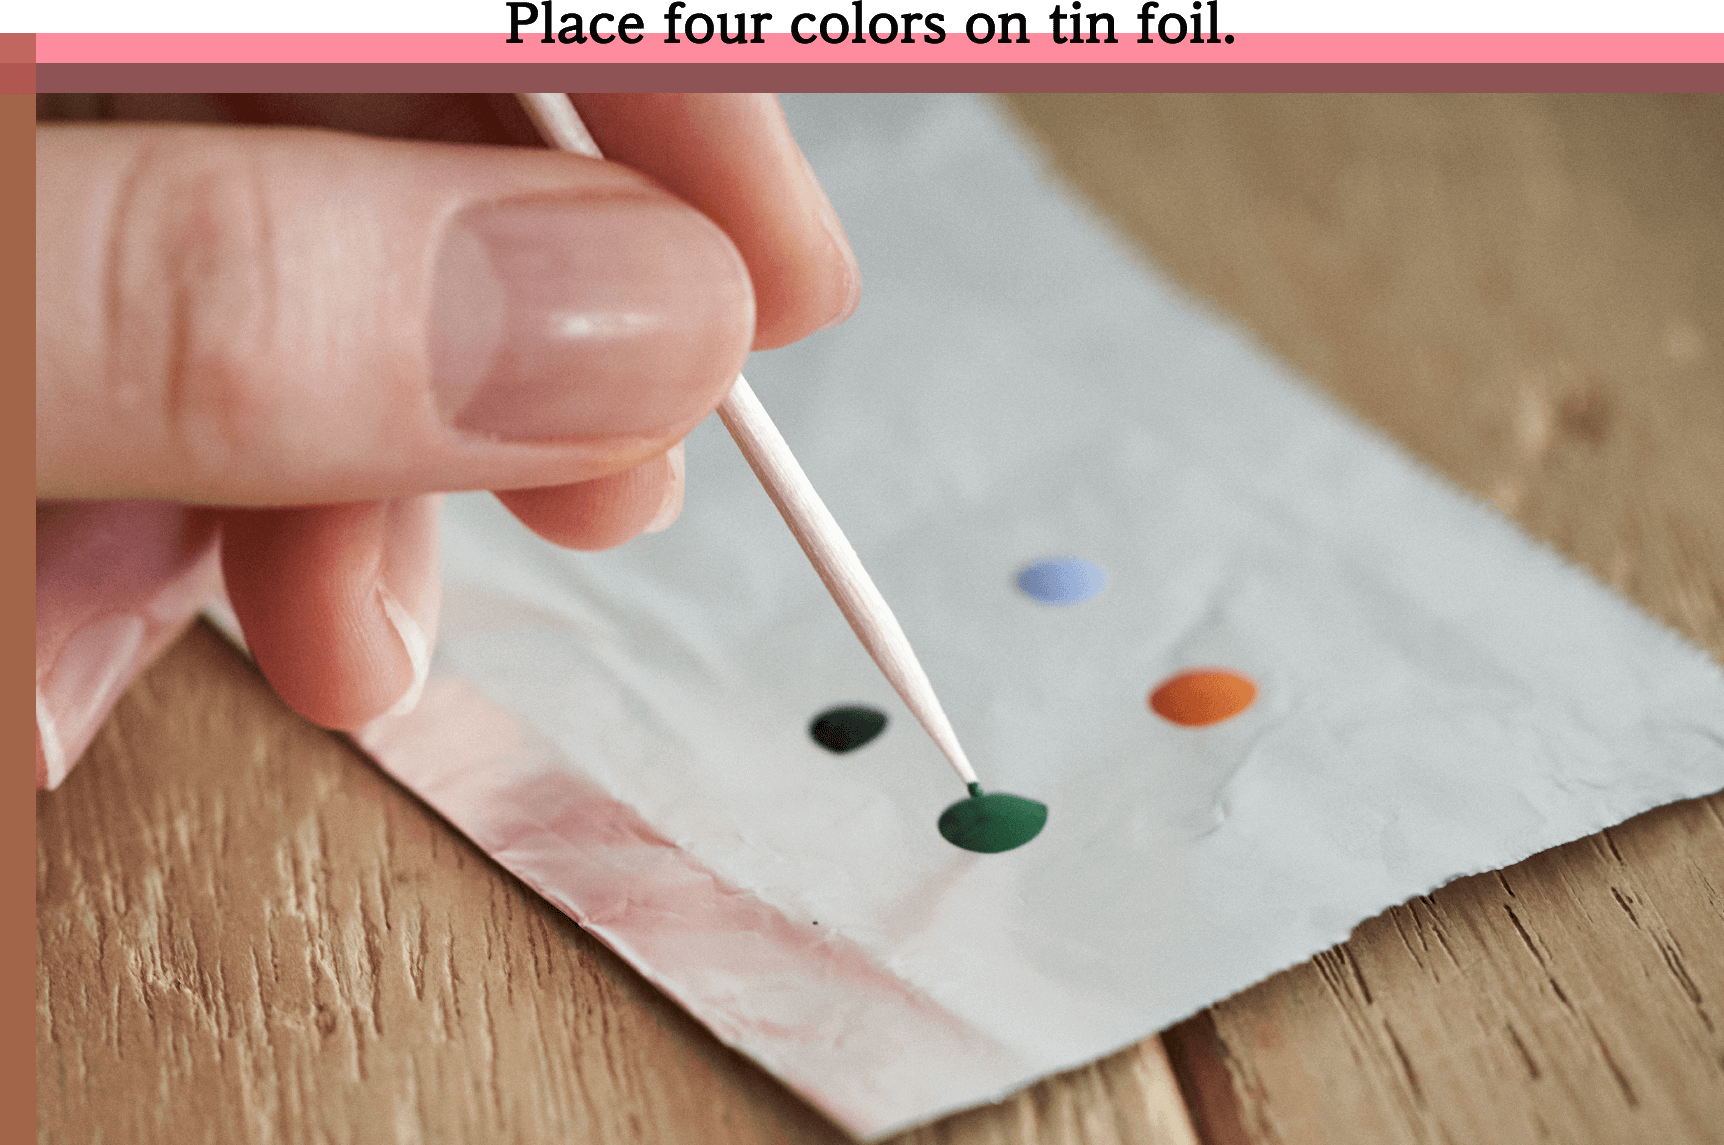
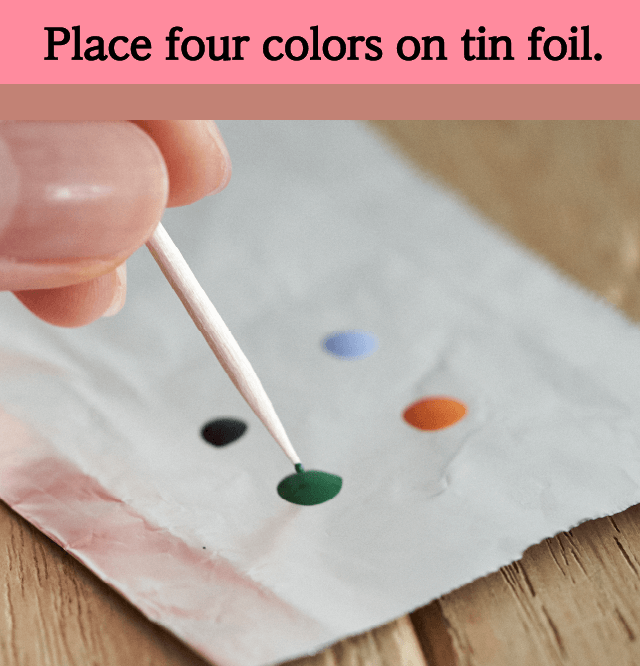
Prepare four toothpicks (one for each color). Place a drop or two of
blue, orange, black and green nail polish onto tin foil. If they start to
dry as you continue with the rest of the nail art, add some more.
blue, orange, black and green nail polish onto tin foil. If they start to
dry as you continue with the rest of the nail art, add some more.
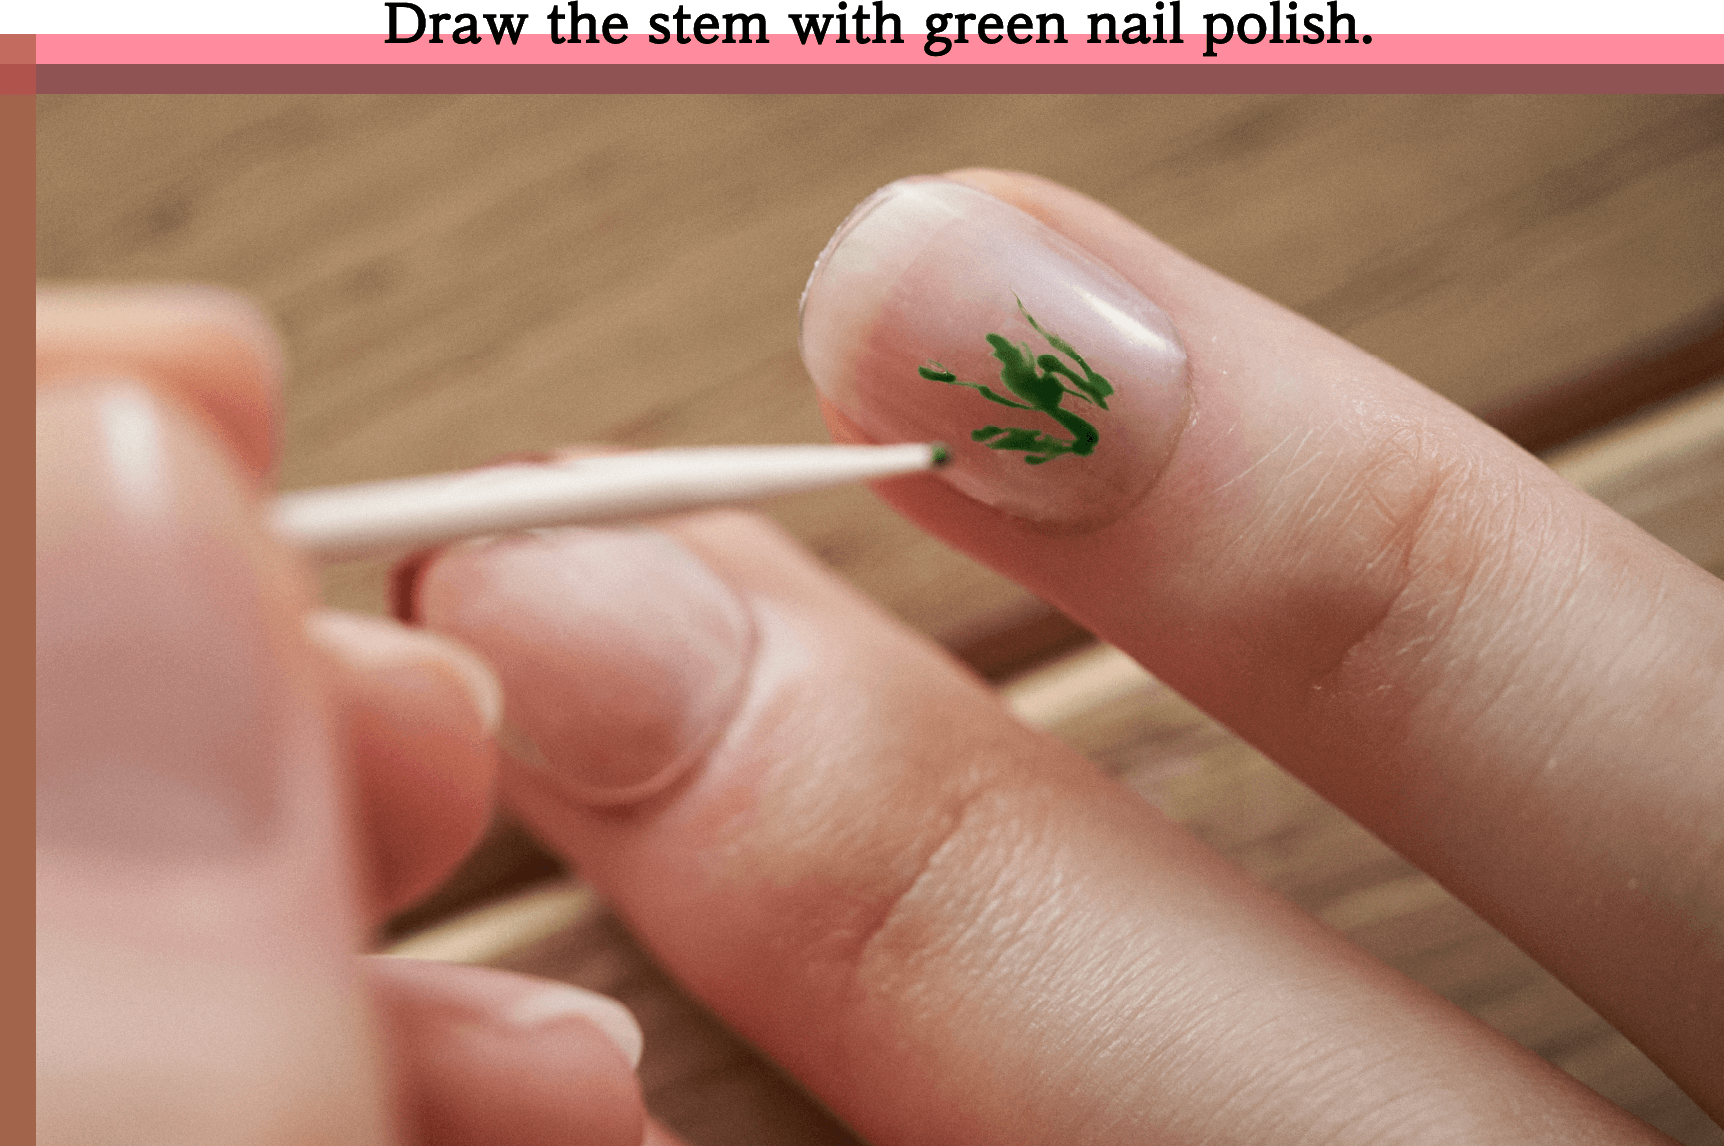
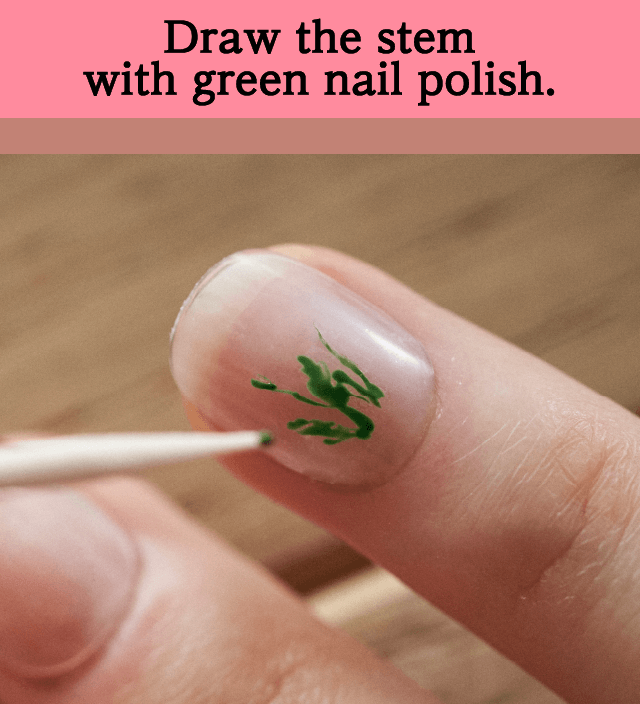
Take the green nails polish with the tip of a toothpick and draw stems
and leaves from the root of your nail upwards. Have an image in mind
of drawing a long stem on the left, and a short one on the right. It
may seem hard, but it will look okay with random strokes, do don't
worry too much!
and leaves from the root of your nail upwards. Have an image in mind
of drawing a long stem on the left, and a short one on the right. It
may seem hard, but it will look okay with random strokes, do don't
worry too much!
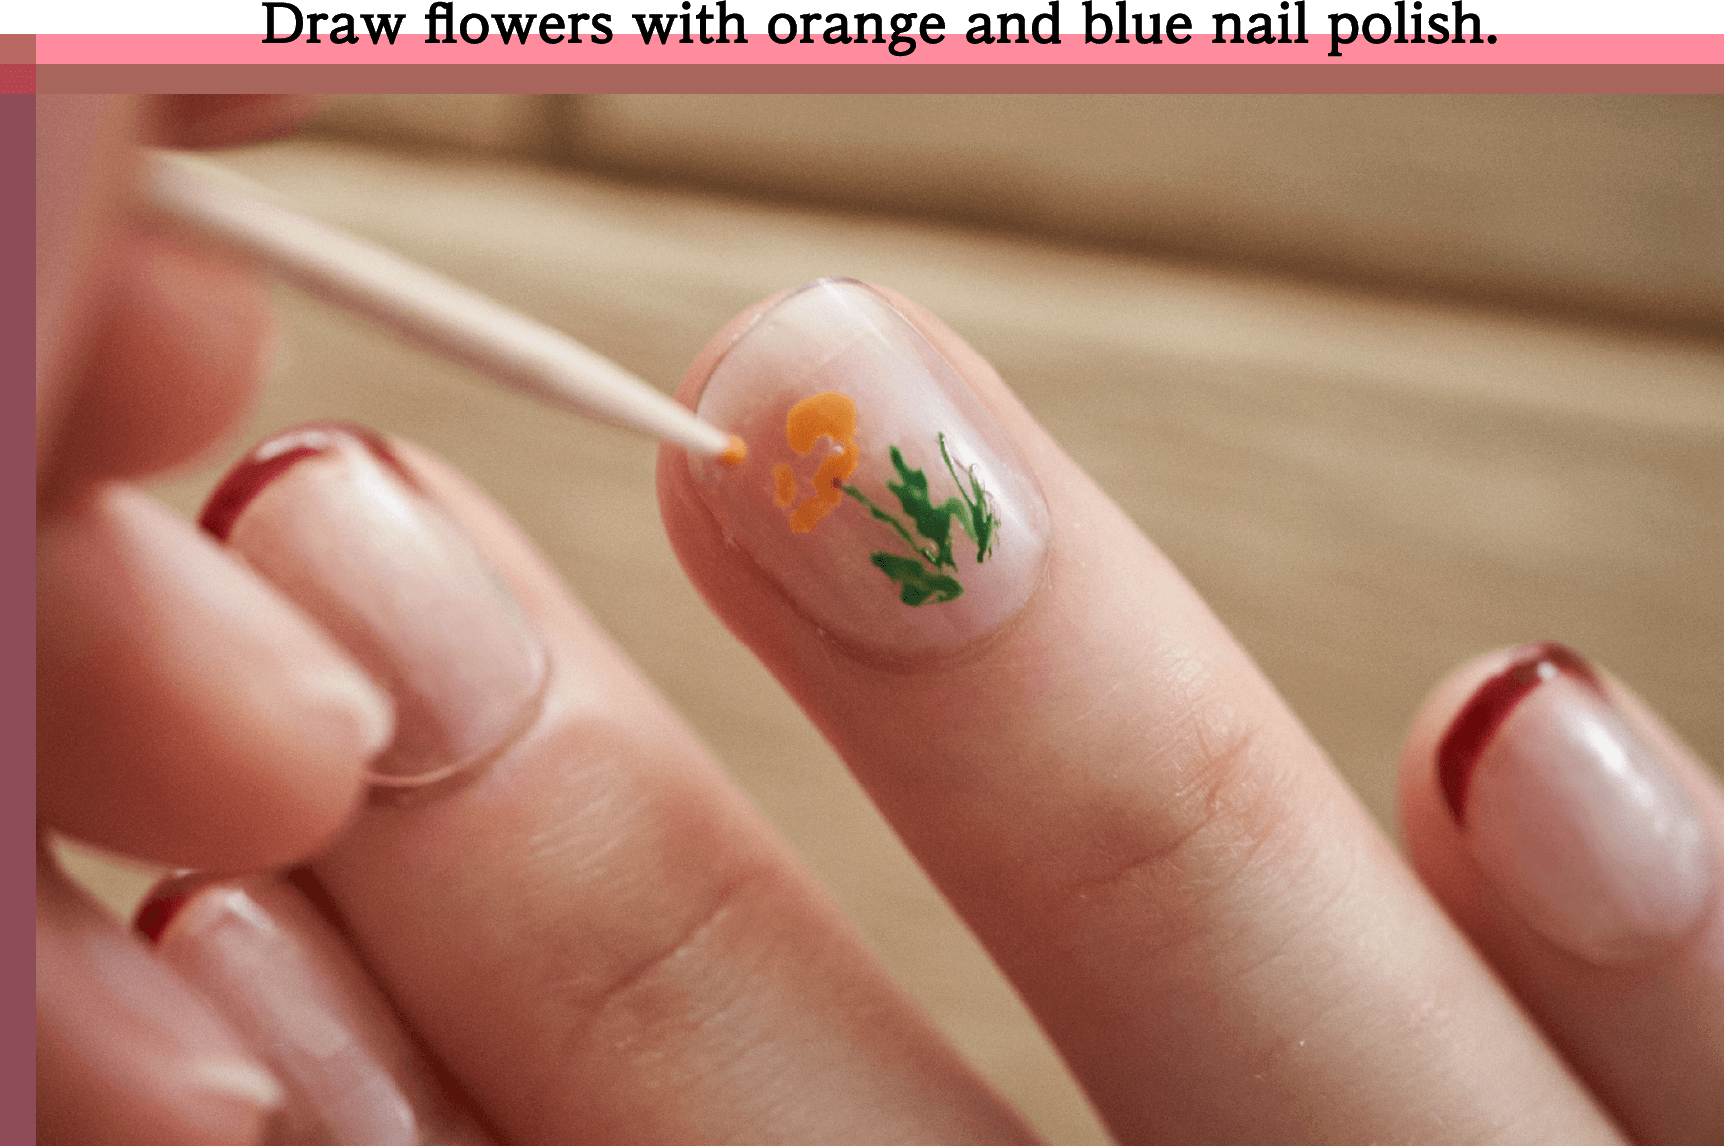
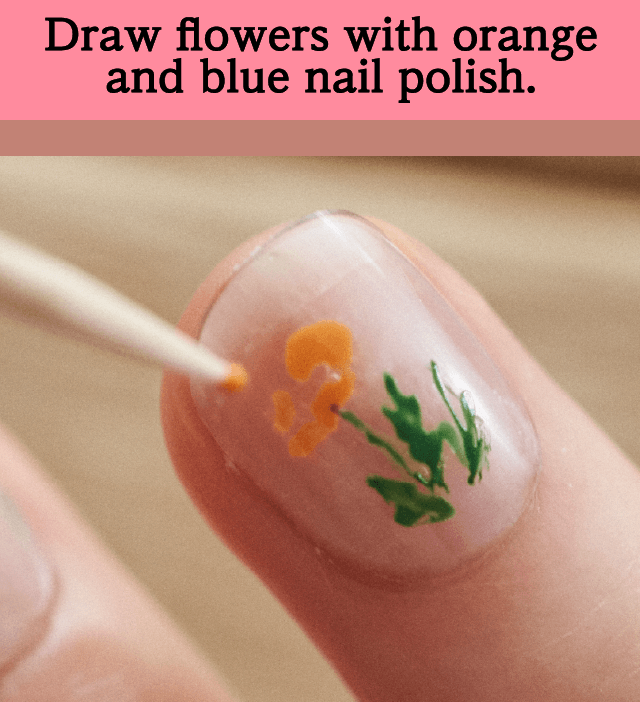
Take some orange nail polish with a toothpick (a little more than you
think) and place four or five random dots around the tip of the stem
on the left. Change toothpicks and put on blue nail polish on the tips.
Draw dots around the right stem, imagining a flower that's long
vertically. The more random the overall silhouette is, the more natural
it will look, so you can draw both flowers without thinking too much.
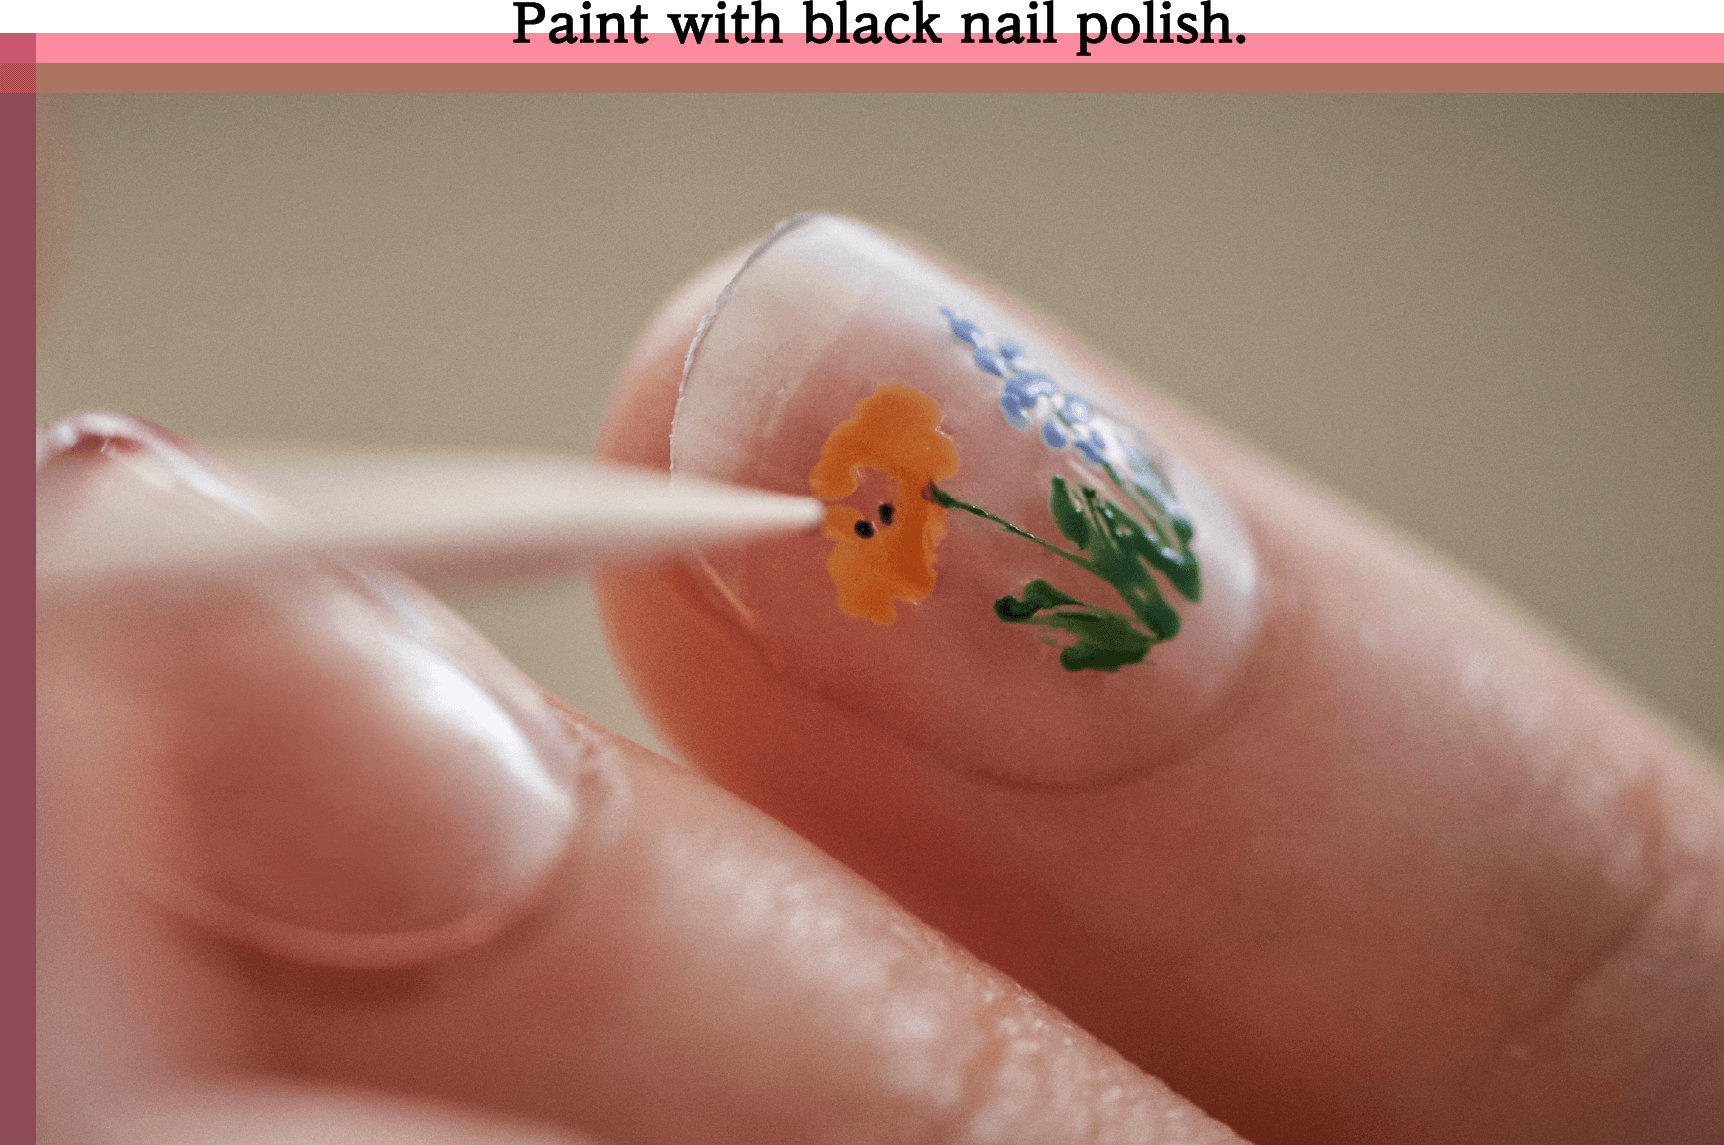
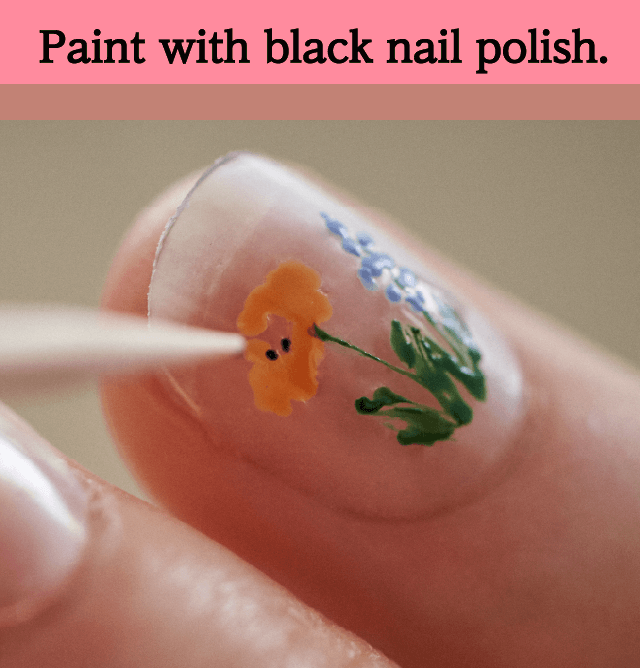
Change toothpicks once again and pick a small amount of black nail
polish. Apply approximately four small dots on the center of the
orange flower, and five or six small dots where there's space in
between the blue flowers. This creates a realistic look and will bring
the whole look together. Once you've applied top coat after it's dried,
you're all set to go!
polish. Apply approximately four small dots on the center of the
orange flower, and five or six small dots where there's space in
between the blue flowers. This creates a realistic look and will bring
the whole look together. Once you've applied top coat after it's dried,
you're all set to go!

The intricate flowers provide an accent to this look and looks quite
professional! By combining beautiful colors like orange and blue while
having green as a base, it will naturally look flower-like so it's easier
than it looks. You don't have to draw the blue flowers too.
professional! By combining beautiful colors like orange and blue while
having green as a base, it will naturally look flower-like so it's easier
than it looks. You don't have to draw the blue flowers too.
From the left:
Amplitude [11 Green]
JPY 3,500 (tax excluded)
https://www.amplitude-beauty.com/en/
Mary Quant [003]
JPY 1,300 (tax excluded)
https://www.maryquant.co.uk/
Mary Quant [023]
JPY 1,300 (tax excluded)
https://www.maryquant.co.uk/
green [Lilas]
JPY 2,200 (tax excluded)
https://www.manucurist.com/en/
NAILS INC / TAT Inc. [NailPure Tate]
JPY 2,600 (tax excluded)
https://www.nailsinc.com/

・Wiping any oils off your nails with nail polish remover or ethanol
before you apply nail polish will make your nail art last longer.
・After using nail polish, wipe off any polish that smudged on to the
edge of the bottle with nail polish remover. This will make it last
longer.
before you apply nail polish will make your nail art last longer.
・After using nail polish, wipe off any polish that smudged on to the
edge of the bottle with nail polish remover. This will make it last
longer.


After working at a nail salon in Omotesando, she opened her own
home salon after giving birth to her child. Known for her fashionable
nail art that's done with care, and her warming personality.
Instagram @takahira_ayako
home salon after giving birth to her child. Known for her fashionable
nail art that's done with care, and her warming personality.
Instagram @takahira_ayako
(Staff List)
Photographer: Daisuke Taniguchi
Nailist: Ayako Takahira
Text: Sayoko Imamura
(Items used)
tsuki.s Ladies Large T-Shirt
JPY 8,000 (tax excluded)
Biwa Cotton T-Dress
JPY 15,000 (tax excluded)
Photographer: Daisuke Taniguchi
Nailist: Ayako Takahira
Text: Sayoko Imamura
(Items used)
tsuki.s Ladies Large T-Shirt
JPY 8,000 (tax excluded)
Biwa Cotton T-Dress
JPY 15,000 (tax excluded)
Share
2019-07-08-WED